What’s the biggest determinant of career and business success? While several factors come into play, your success depends largely on your network and the relationships you build. In fact, 80% of professionals consider networking as “essential” for their career success.
And the benefits of networking aren’t limited to a rewarding career. It’s equally important for your client/customer relationships and business growth. 75% of customers prefer meeting before making a purchase, and the closing rate of in-person meetings is 40%.
Whether you want to climb up the corporate ladder or skyrocket your sales and revenue, you must grow your network and build meaningful relationships.
But networking is changing rapidly, and the age-old networking tactics like traditional business cards and trade shows don’t work as well as before. You need to upgrade your networking efforts in order to grow your network effectively.
And here’s where digital business cards come into the picture.
If you’re new to digital business cards, you’re at the right place. Here’s the only guide to digital business cards you’ll ever need.
- Why Digital Business Cards Are the Future of Networking
- What is a digital business card?
- How does a digital business card work?
- How to create a digital business card?
- Steps to enable Two-Way Contact Sharing on your business card
- Where can you access the details of your collected contacts?
- How to add an appointment or meeting scheduling feature to your digital business card
- Can you edit your digital business card?
- What should you include on a digital business card?
- What data is saved when someone saves a digital business card on their phone?
- How to share your digital business card?
- Benefits of using digital business cards
- Best practices for virtual business cards
- Digital business card mistakes to avoid
- Summary
Why Digital Business Cards Are the Future of Networking
The pandemic shifted networking to a hybrid model, blending digital and physical interactions. Digital business cards streamline this process, enabling instant information sharing and engagement, whether in person or online.
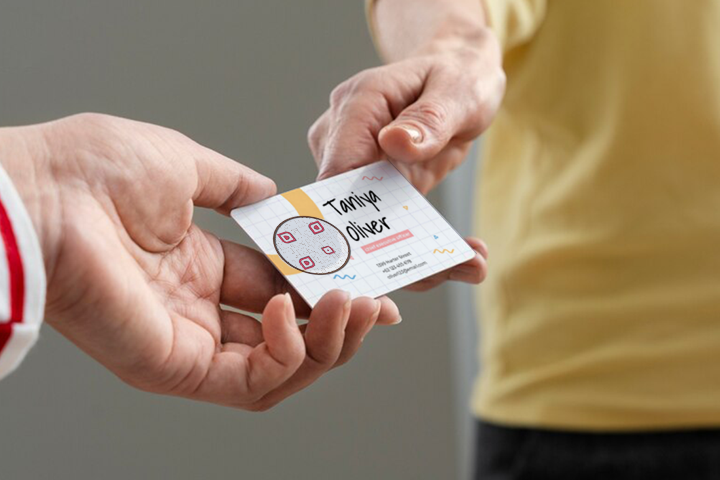
By integrating QR codes into physical cards, individuals can seamlessly transition between the two, enhancing networking efficiency.Once the pandemic ended, in-person networking resumed as normal. But 63% of people continue to prefer digital networking for its accessibility and ease of use.
🤔 Did you know?
88% of all business cards handed out are tossed away within a week.
What is a digital business card?
A digital business card is a web page containing your contact details, social links, web links, images, videos, and other information. It also has buttons to allow users to save and share contact with a single click.
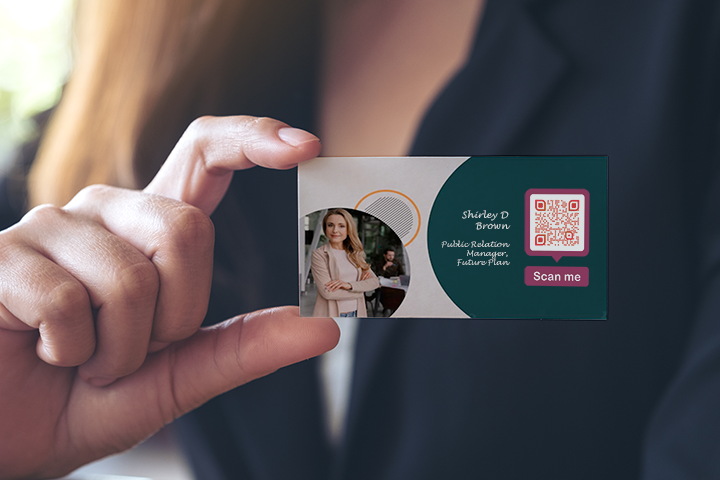
Think of a virtual business card as an online profile page comprising all your professional details. Users can visit the page to obtain your information, save your contact details, and contact you.
Hence, these cards eliminate the need for manually entering the contact details and expedite the contact-saving process.
How does a digital business card work?
These cards streamline the sharing of contact information by enabling users to instantly distribute their details via QR codes, social media platforms, or direct URLs. They can also be easily stored in Google Wallet and Apple Wallet.
When recipients access this on their smartphones, they can effortlessly save the contact information with the “Save to Contacts” option, and also take further actions such as making calls or sending emails.
These virtual cards provide a more engaging and environmentally friendly way to network, ensuring straightforward access to information and an efficient method for connecting in today’s digital age.

How to create a digital business card?
QRCodeChimp allows you to create a mobile-friendly virtual business card in a few easy steps. You don’t need any tech knowledge or experience, and the learning curve is negligible.
Follow these steps to create a digital business card:
Log in with your QRCodeChimp account, go to the Digital business card solution, and follow the steps to create it.
Step 1: Set information in the ‘Content tab’
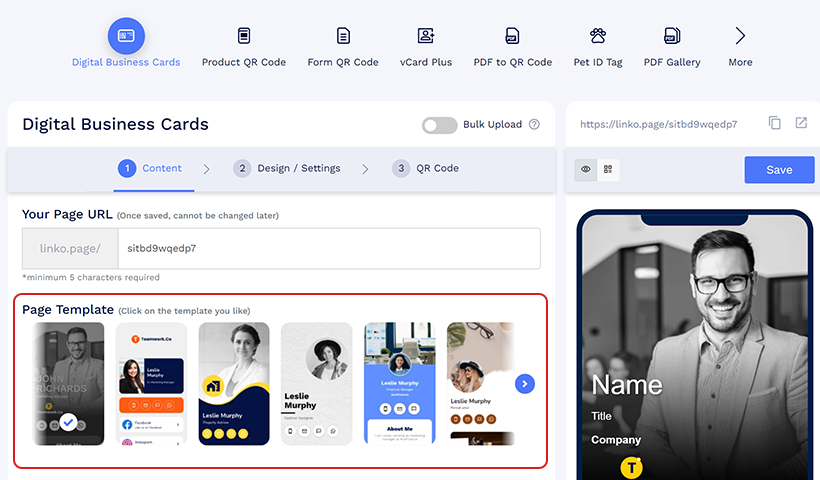
1.1: Select a page template
Select a page template from 20+ professional designs that best aligns with your professional and personal identity.
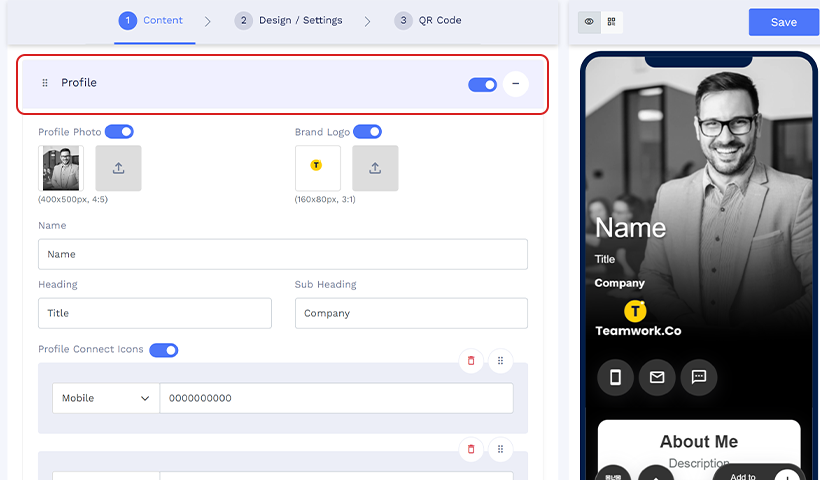
1.2: Fill details in the Profile component
Set the profile image, brand logo. Enter your name and heading (such as company name). Enable the profile connect icons and enter details such as mobile number, email, etc. To add more details click on the Add More button.
1.3: Set heading
In the Heading + Text component, enter the title and the description.
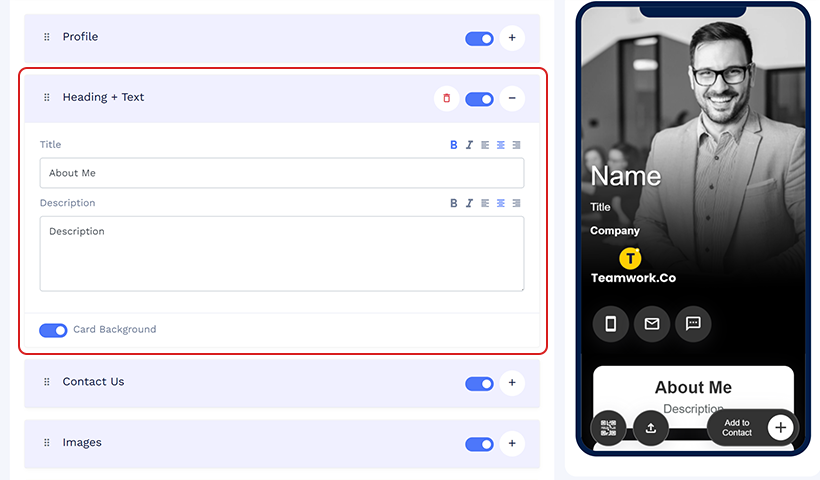
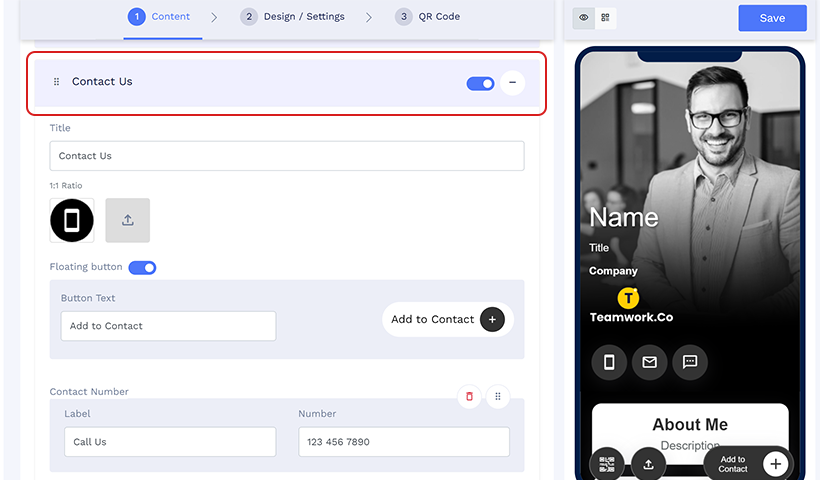
1.4: Add contact details
Enter your contact number, email id, and address. You can also change the button text if needed.
QRCodeChimp offers a feature of whether your digital business card link is saved in the contacts of your end users when they add your details to their phones. ‘Save e-business card links to contacts‘ switch according to your preference.
Note: This switch is enabled by default, and the option to disable it is available as a paid feature.
1.5: Add images
In the images component, add images and select the view type(List, Grid 1, Grid 2).
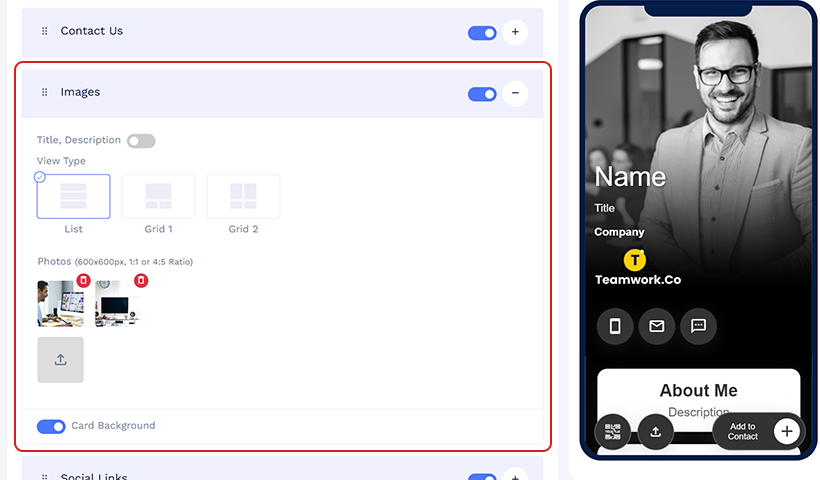
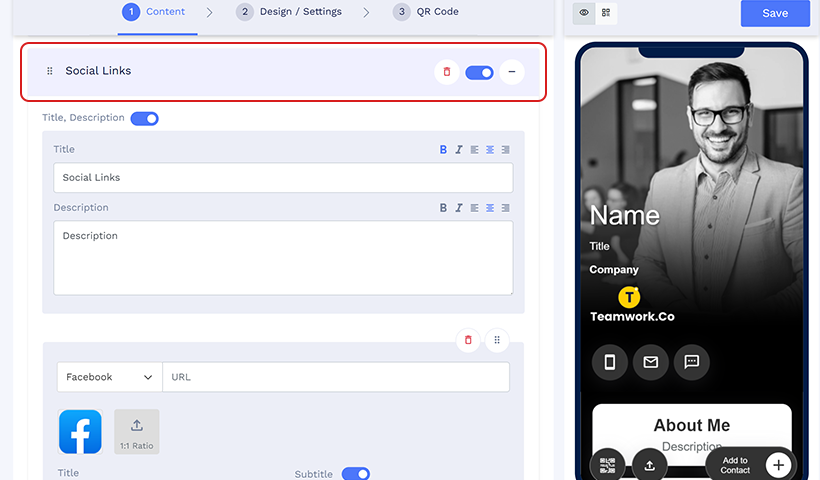
1.6: Add Social links and other links
You can easily share your social media links or website URL here in these components.
1.7: Collect Contacts
Enable this feature to display the contact exchange form when someone scans your digital business card. Once “Collect Contacts” is activated, a default contact exchange form will be added to your digital business card. You can customize the form fields to suit your needs.
Note: To add the “Collect Contact” feature to your Digital Business Card, click ‘Update Terms and Privacy Policy,’ accept the Form Usage terms by checking the box, and filling all mandatory fields in the Form Settings pop-up.
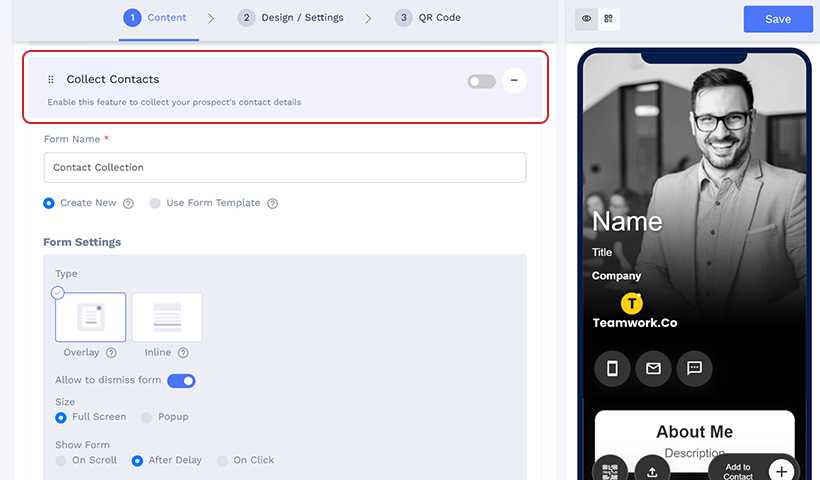
Add more components if required and click on the Next button.
Step 2: Design your Digital business card
2.1: Set background
Click ‘Background Image’ to set a background image or video from our collection of 40+ backgrounds or upload images for your business card background.
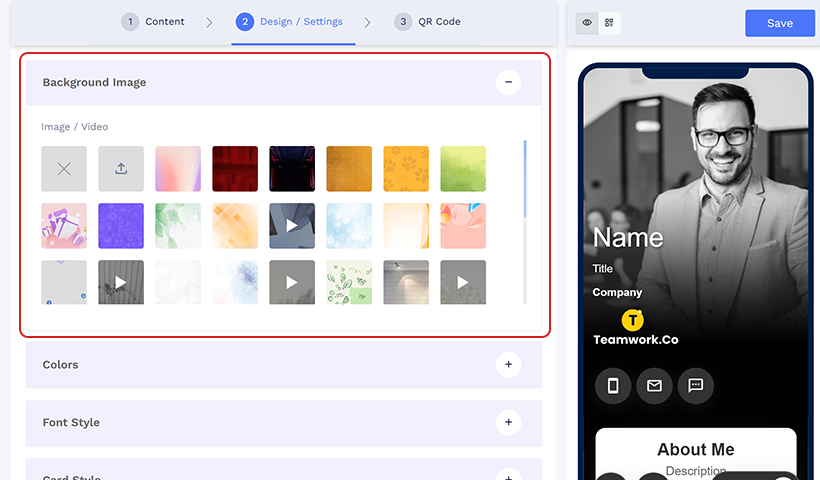
2.2: Select colors, font, and set page loader
Set colors and fonts according to your brand book or brand identity. You can also edit the card style to customize the background color, corners, drop shadow color, etc. You can upload your page loader icon, e.g., your brand logo, under the ‘Page Loader’ section.
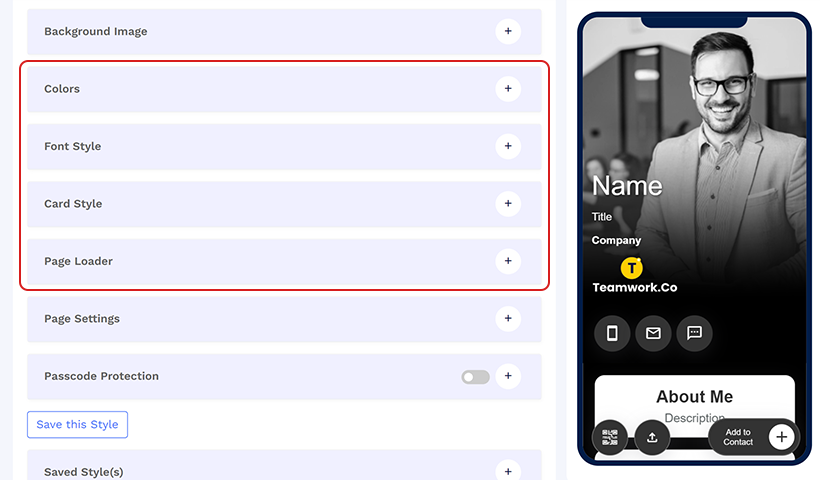
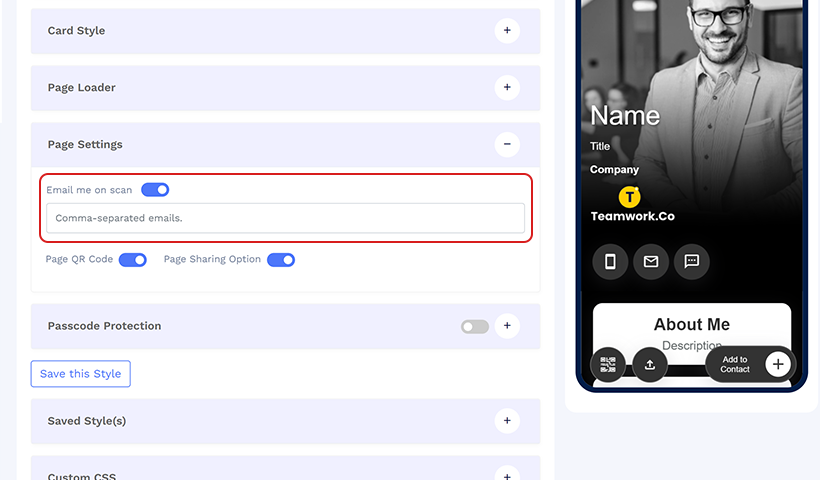
2.3: Get scan alerts.
In ‘Page Settings,’ you can turn the scan alert email on or off by clicking the ‘Email me on scan’ button.
Note: Scan alert emails are part of our premium plans and available only to paid users.
2.4 (Optional): Make it passcode protected.
Enabling ‘Passcode Protection’ will prompt the users to enter a passcode to access the information after scanning the QR code. Here, set the passcode, session timeout, prompt heading and description, passcode input label, and button label.
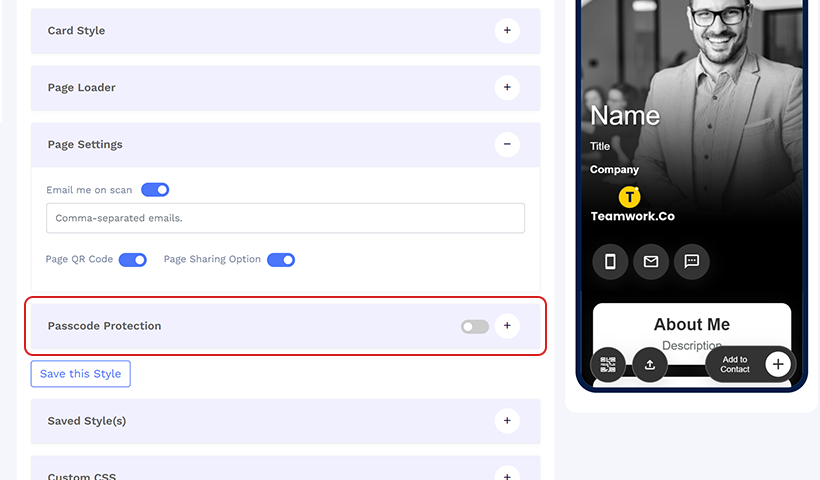
Note: Save your digital business card design by clicking on ‘Save this Style’
To maintain design consistency, you can use the same design from ‘Saved Style(s)’ in the future.
Click on the Next button to customize the QR code.
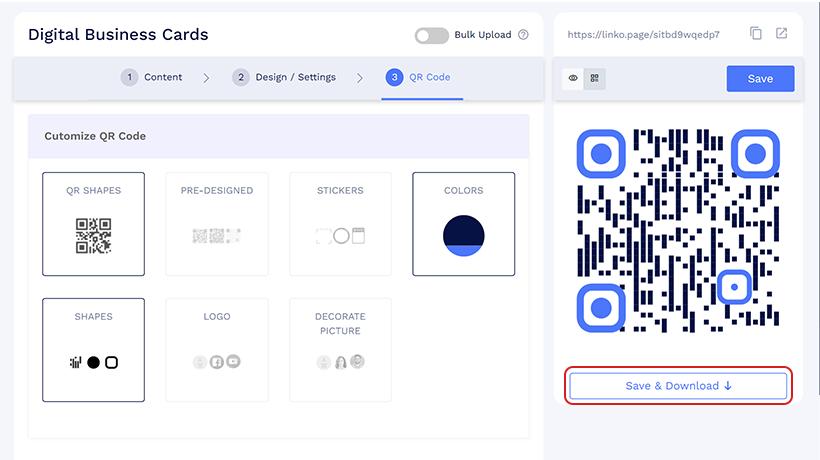
Step 3: Customize the QR code design
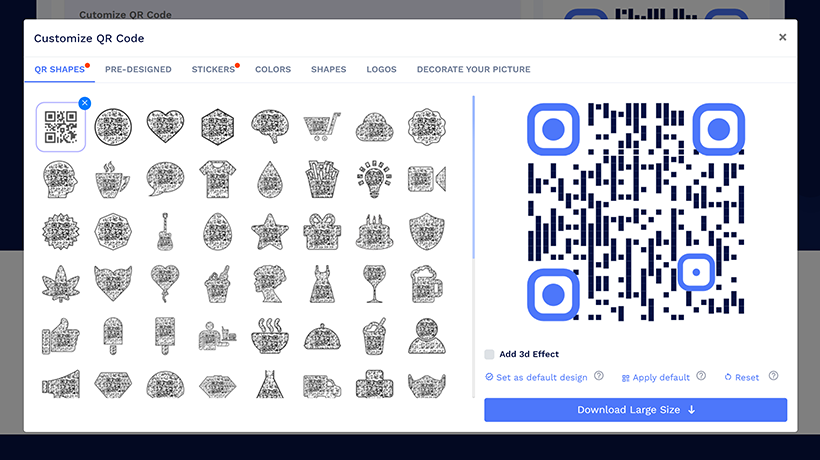
3.1: Edit the shape of the QR code.
Click ‘QR SHAPES’ to select from 70+ unique QR code shapes. Further, you can edit the shape, border size, and padding around the eyes.
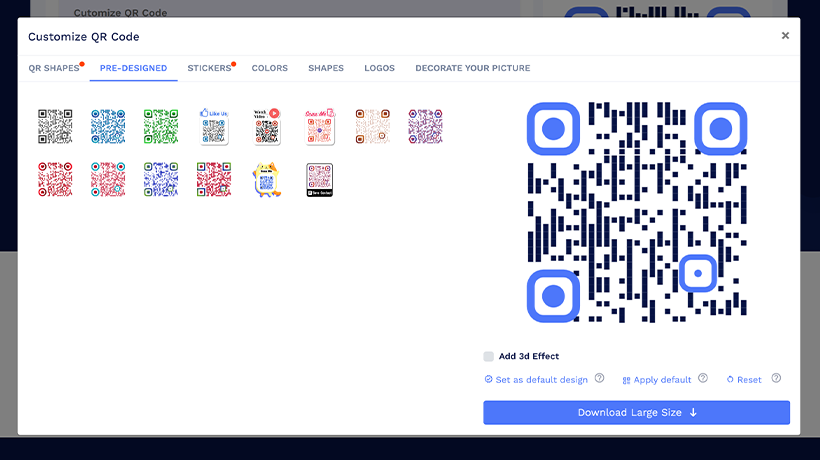
3.2: Choose from pre-designed QR code designs and stickers.
Click ‘PRE-DESIGNED’ and browse through 10+ professional QR code designs.Click ‘STICKERS’ and select from 200+ QR code stickers for your virtual business cards. You can also use a CTA sticker for the QR code to compel users to scan the code.
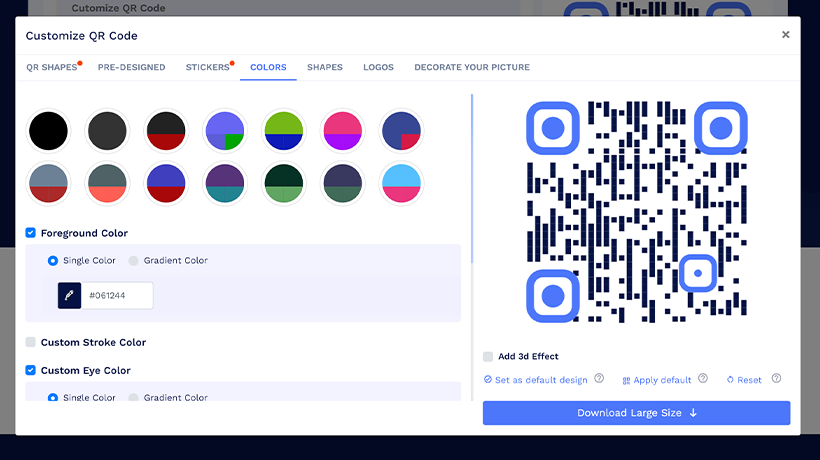
3.3: Select colors for your QR code and add logo.
Click ‘COLORS’ to change and edit the colors of your QR code. Click ‘LOGOS’ and upload your logo.
You can also edit logo scaling, background scaling, and positioning.
Step 4: Save and download
Once done, click on “Save” to save your digital business card and QR code. Download it from the dashboard.
Steps to enable Two-Way Contact Sharing on your business card
To enable two-way contact sharing, log in with your QRCodeChimp account and follow the simple steps:
Step 1: Select the QR code solution
Select the QR code solution Digital business card and fill in the details.
Step 2: Enable the ‘Collect Contacts’ option
In the Content tab, enable the “Collect Contacts” option to display a contact collection form when someone opens your digital business card. Activating this feature will add a default contact exchange form, which you can customize using the following steps.
Step 3: Form name and form creation
Begin by entering the form’s name and then choose the method for creating the form.
Below are the steps to create a new form:
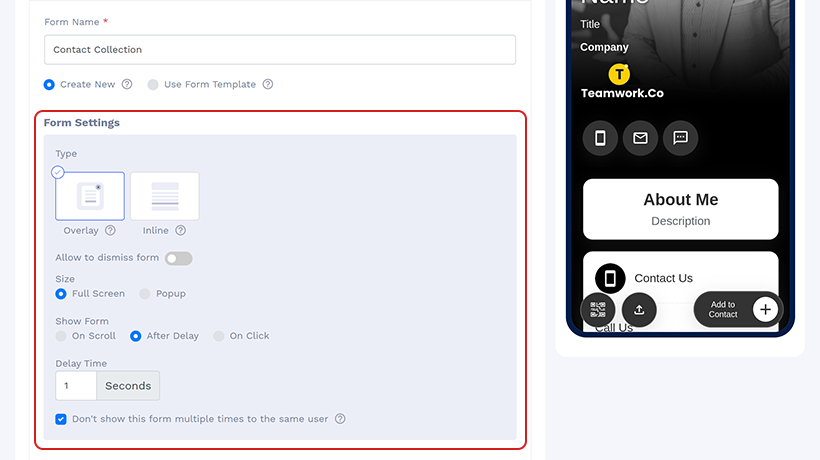
Step 1: Set the Form settings
In the form settings section, select the options such as:
Type: Select from the two types, ‘Inline’ and ‘Overlay.’
(You can find the following options only if you select the Overlay type.)
Size: Full screen and popup are the two form sizes available.
Show form: On Scroll, after delay, and on click are the three options to show the form.
- Set the scroll position if you select the on scroll option.
- If you select the after delay option set the delay time.
- Set the button label if you choose the on click option
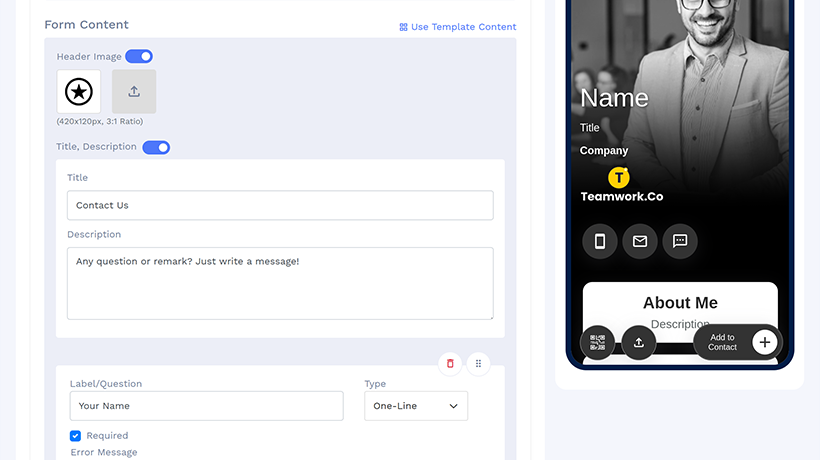
Step 2: Add Form Content
In the form content section, set the header image, add the title and description in the respective fields.
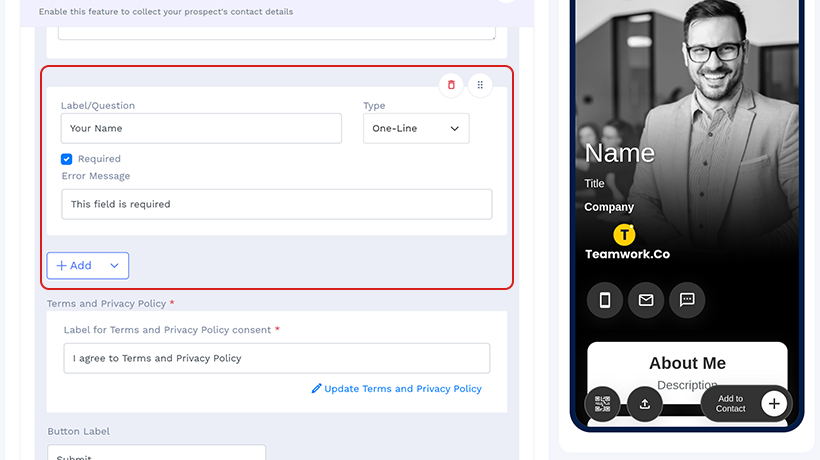
Step 3: Add fields
Add the questions/labels or the fields and the type you want to display on the form.
Step 4: Terms and Privacy Policy
Set the label for Terms and privacy policy consent. Click on ‘Update Terms and Privacy Policy’ to add more details.
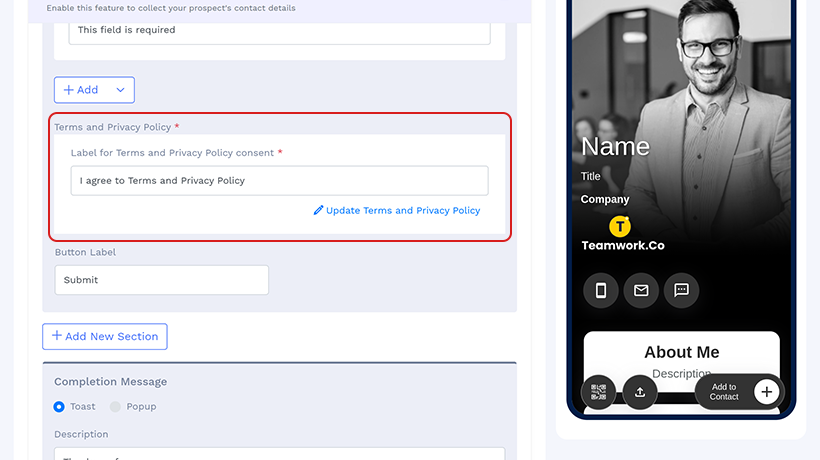
Note: You can use the Add new section button to add more sections in the form.
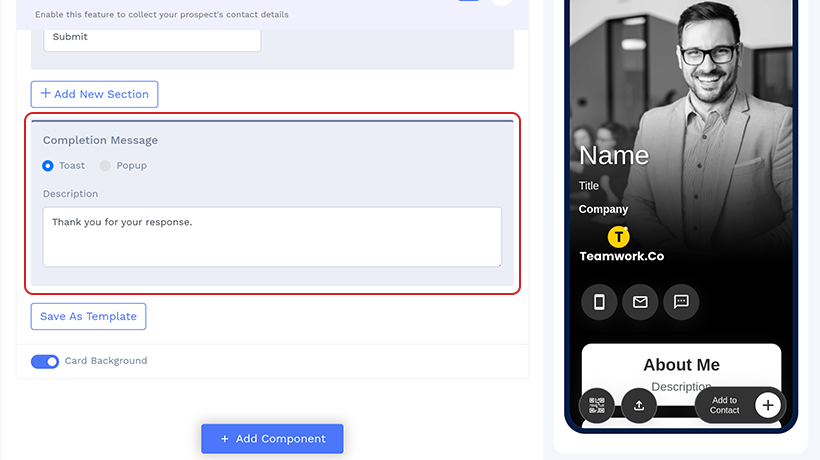
Step 7: Set a completion message
Select the way the completion message should be displayed, i.e., Toast or pop-up. Fill in the description and other details.
Steps to use form template:
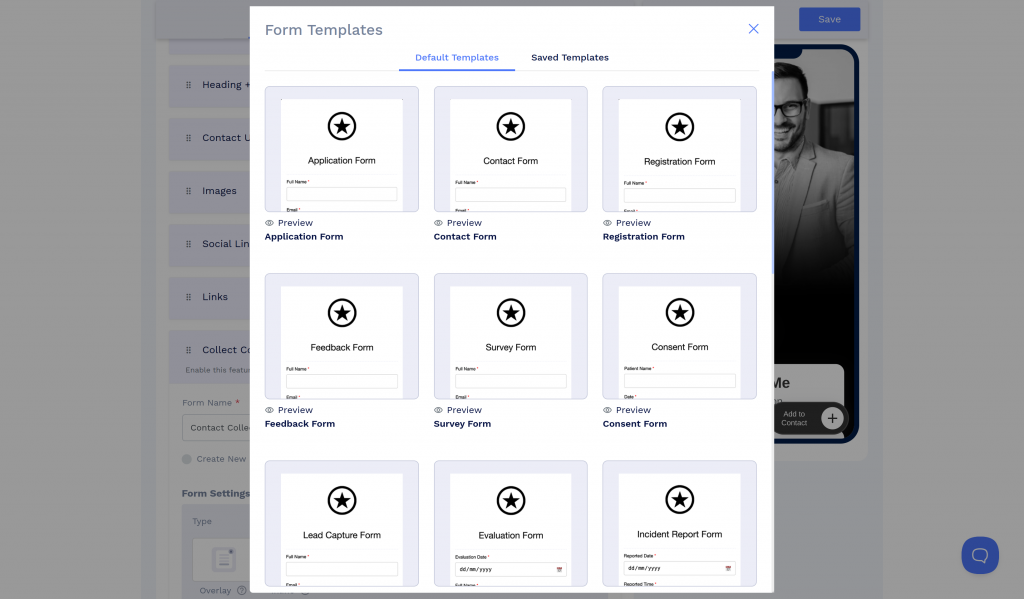
Step 1: Choose the template
Choose the template from the default template list or the saved list.
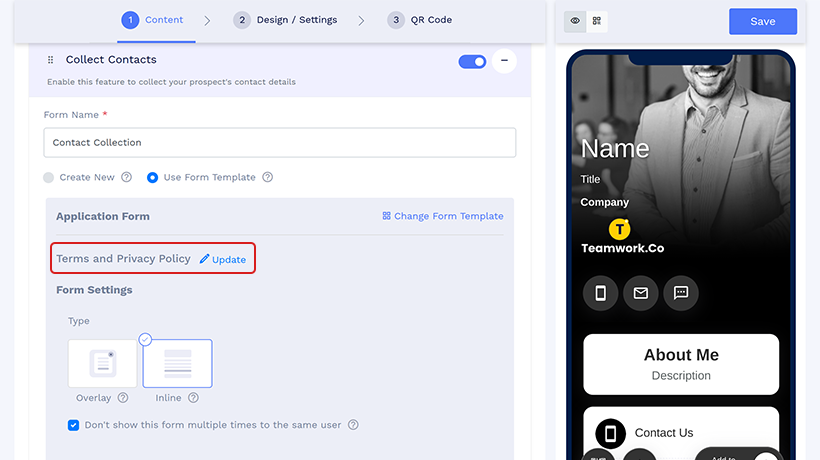
Step 2: Update the terms and privacy policy
Click update the terms and privacy policy and add your email address and the terms and privacy policy.
Step 3: Set the Form settings
In the form settings section, select the options such as:
Type: Select from the two types, ‘Inline’ and ‘Overlay.’
(You can find the following options only if you select the Overlay type.)
Size: Full screen and popup are the two form sizes available.
Show form: On Scroll, after delay, and on click are the three options to show the form.
- Set the scroll position if you select the on scroll option.
- If you select the after delay option set the delay time.
- Set the button label if you choose the on click option.
Note: The fields of form template is not customizable.
By following the above steps, you have enabled two-way contact sharing. You can now proceed with designing and customization and save the QR code.
Where can you access the details of your collected contacts?
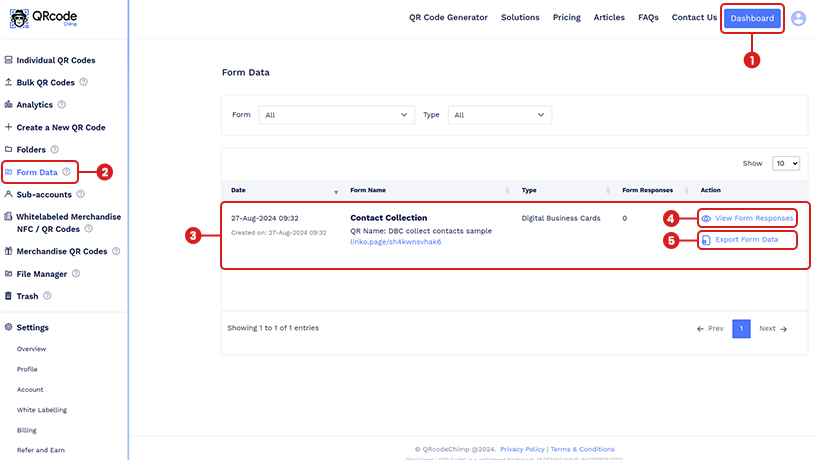
To view the data, log in to your QRCodeChimp account and follow the below-mentioned steps:
Step 1: Click on the ‘Dashboard’ button.
Step 2: Select the ‘Form Data’ option from the sidebar.
Step 3: Select the Form and the type.
Step 4: Click on the View form response.
Step 5: Click on ‘Export Form Data.’
Note: Please check the pricing page and upgrade to ensure continued access to the necessary features.
How to add an appointment or meeting scheduling feature to your digital business card
To seamlessly add appointment scheduling to your digital business card, follow these steps:
Step 1: Go to the Content tab
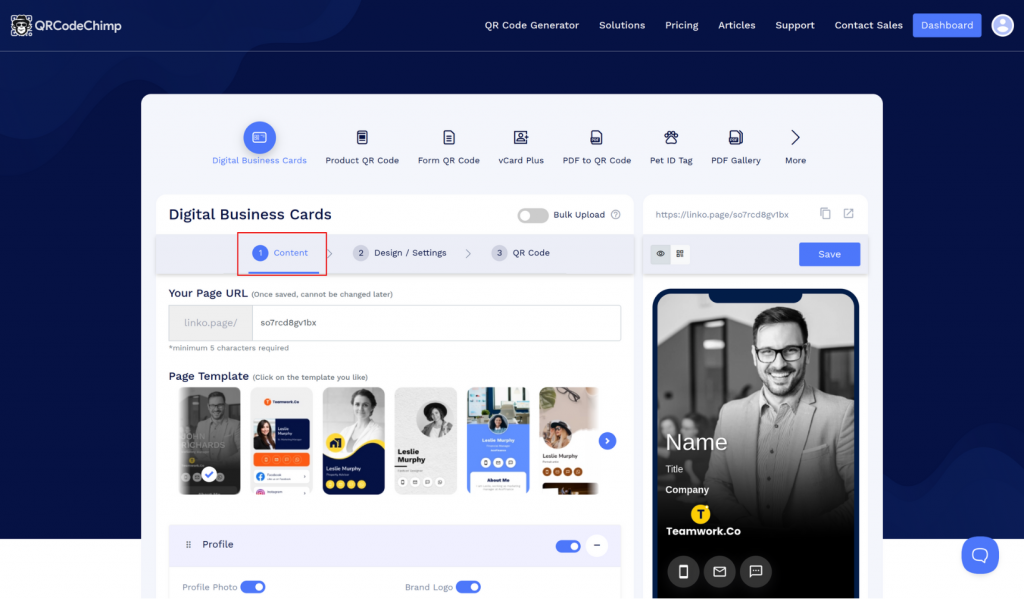
Go to the Content Tab of your digital business card editor. This is where you will find various customization options.
Step 2: Locate and enable the Appointment/Calendar component
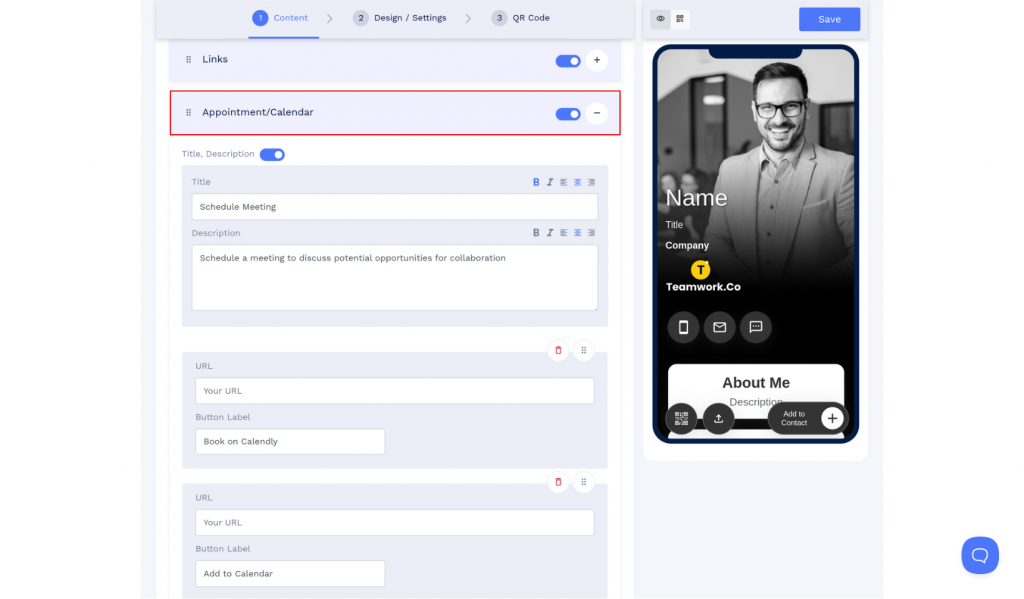
Find the ‘Appointment/Calendar’ feature in the options and click to activate it. This will make appointment scheduling visible and functional on your business card.
Step 3: Input “Title” and “Description”
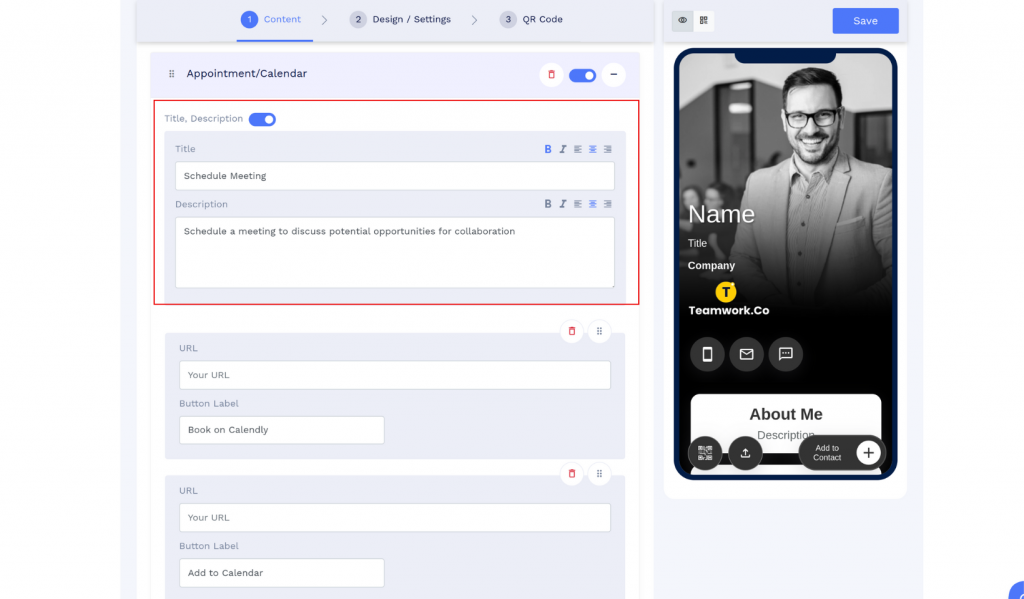
In the given fields, enter a clear and engaging Title that describes the scheduling feature (e.g., “Schedule a Meeting”). Follow this with a brief description that provides context or instructions for users on how to use the appointment scheduling tool.
Step 4: Add the URL
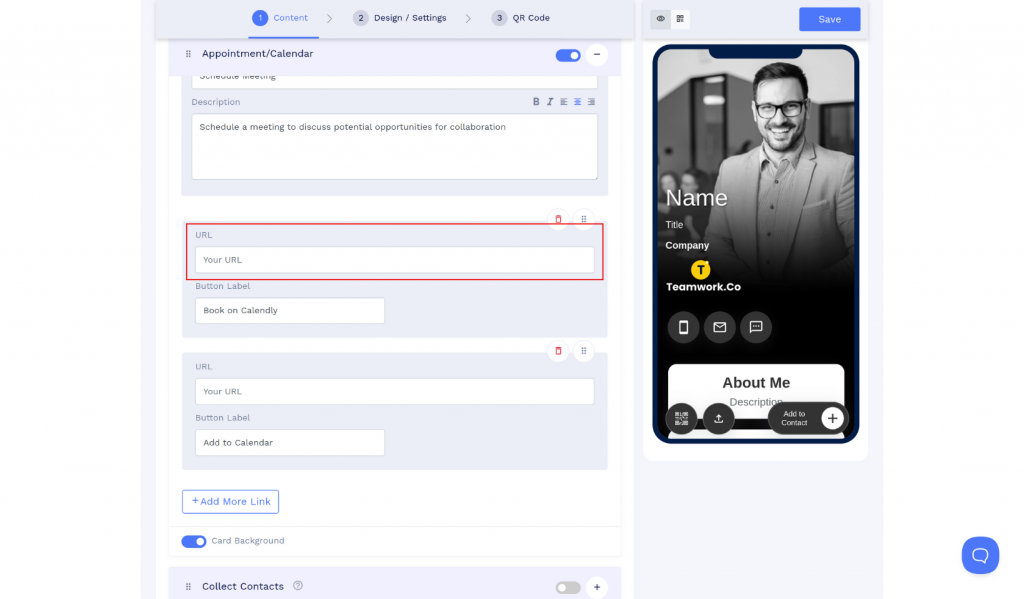
In the URL field, paste the link to your chosen appointment scheduling service, such as Calendly, Acuity, or any other platform you prefer.
Step 5: Customize the button text
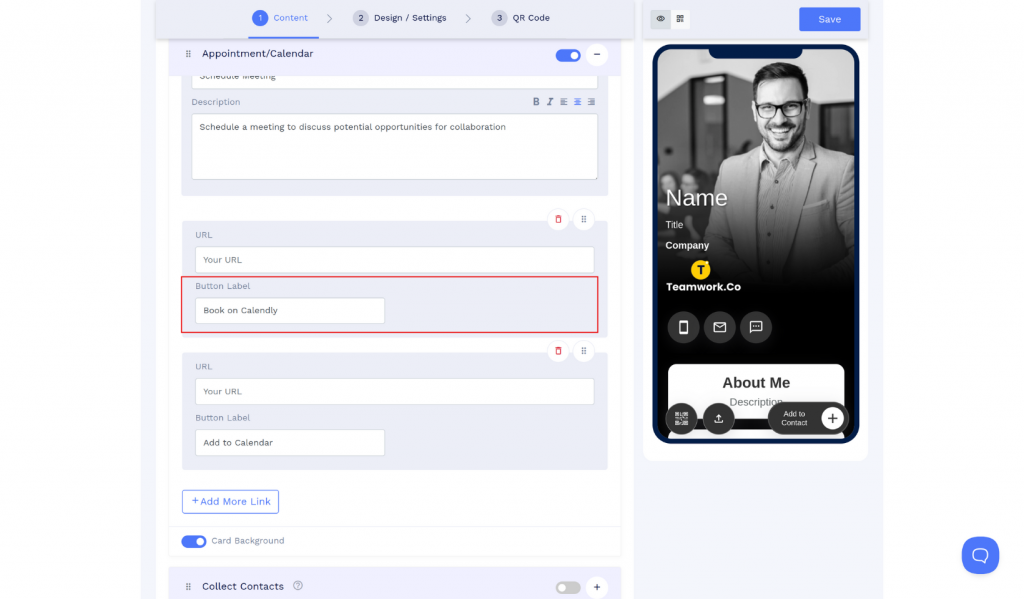
Choose a clear button text that encourages users to take action. Options could include “Book a Meeting on Calendly,” “Schedule Your Appointment,” or “Add to Calendar.”
Step 6: Save changes
Once all information has been filled out, save your changes to ensure the appointment scheduling feature is applied to your digital business card.
By following these steps, you’ll create an efficient and user-friendly way for potential clients or contacts to schedule appointments directly through your digital business card.
Can you edit your digital business card?
Yes, digital business cards created with QRCodeChimp are dynamic and editable. You can edit the contents of your digital business cards without changing their URL or reprinting the QR code.
Follow these steps to edit your digital business card in QRCodeChimp.
Step 1: Log into your QRCodeChimp account and go to the Dashboard.
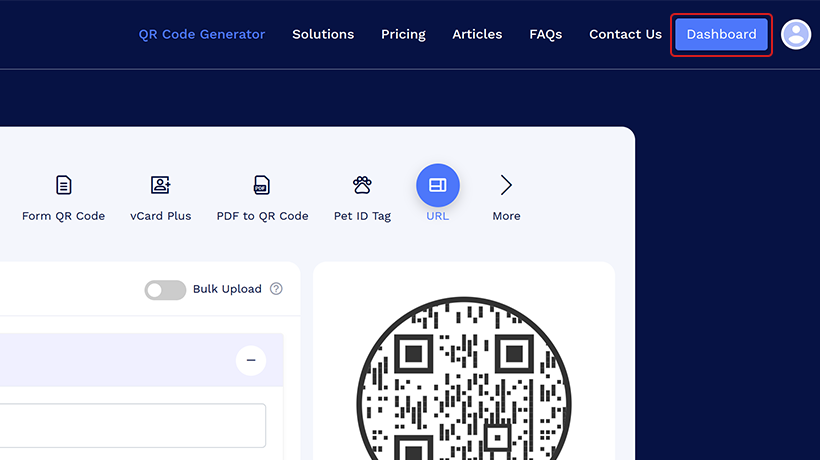
Step 2: Find your digital business card in the Individual QR Codes or Bulk QR Codes list.

Step 3: Click on “Edit” in the action column of the digital business card you want to edit.

Step 4: Edit the contents of your digital business card.
Step 5: Save the changes.
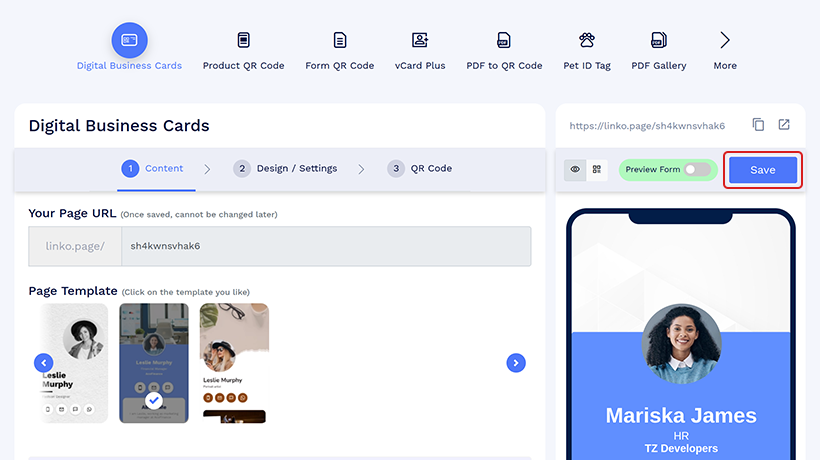
Note: You can’t change the short URL of your digital business card page. Also, if you change the QR code design, you’ll need to reprint it.
How to grant edit access to a digital business card?
QRCodeChimp’s Share Edit Access feature redefines how digital business cards are managed and updated, offering a seamless solution for organizations handling cards in bulk.
This powerful feature eliminates complexity, empowering every team member to effortlessly customize and update their digital business cards.
🧐 Explore more: Sharing Edit Access for Digital Business Cards
What should you include on a digital business card?
Your business card will act as the one-stop destination for all your professional information. So, be sure to include everything you want your audience/clients to know about you.
Here are some elements you should have on your virtual business card:
- Name
- Contact information
- Occupation/designation, company name, and other professional details
- Social media profile links
- Web links
- Images and videos
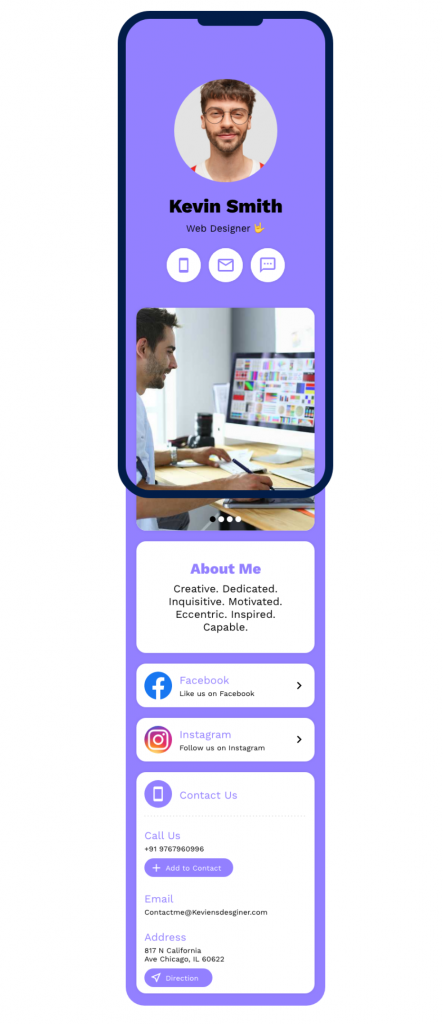
Besides, you can add components to your card as per your profession and requirements.
What data is saved when someone saves a digital business card on their phone?
When a digital business card (DBC) is saved to a phone, it includes saving various data. This encompasses the profile component, which consists of the profile photo, name, heading, and subheading. Additionally, the contact information provided in the “Contact Us” section, such as the contact number, email address, and physical address, is saved on the phone.
Furthermore, data that you add to the Links and Social links components will also be saved to your phone.
How to share your digital business card?
Creating a business card is only half the work done. You need to share it effectively to reach more people and grow your network.
There are two ways to share your electronic business cards:
- Share the card URL with your connections.
- Print the QR code on a physical business card, and users can scan the QR code to reach your online business card.
Printing the QR code on your business card is the most effective way to share your e-business card.
Including a QR code on your business card enables you to:
- Make your business card modern and visually appealing.
- Enhance the functionality of your business card and make it actionable.
You can also share and collect contact with the same QR code. Two-way contact sharing allows you to easily share and collect contact with a form.
Benefits of using digital business cards
Virtual business cards offer numerous networking benefits. They make contact sharing faster, helping you reach more people and build more connections. If you want to build relationships for career or business growth, virtual business cards help you do that.
Let’s look at the key advantages of using e-business cards.
Seamlessly share your contact information
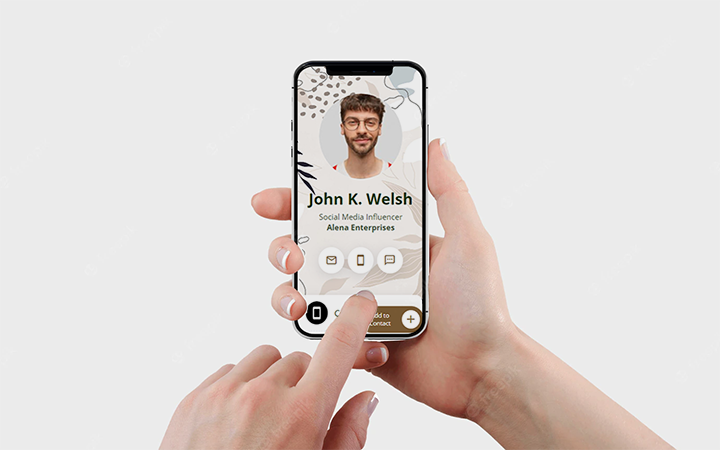
This card allows you to instantly share your contact details and makes it easy for others to save them. Unlike paper cards, which require tedious manual entry and risk errors, business cards simplify the process. Users can access your information instantly without manual input.
With QRCodeChimp, business cards come with a “Save to Contact” button for one-click saving, as well as options for sharing the contact and adding it to the home screen.
Expedite networking and build more connections
This card enables you to share your contact information quickly and easily. This, in turn, results in faster networking and helps you build more connections. If you need to frequently share your contact details, you must make the contact-saving process lightning-fast. And digital business cards make it possible.
Share all your information in one place
People are smarter than ever, and they want to know everything about you before connecting with you. Unfortunately, paper cards have limited space, and you can’t share all your details there.
These business cards resolve this hurdle. You can include in-depth information on a digital business card, including your contact details, occupational information, social media links, web links, images, and videos.
As a result, your connections can know everything about you and make informed decisions.
Edit your information anytime
Imagine creating hundreds of business cards, and then your phone number changes.
What are your options here?
None.
The only thing you can do is reprint your business cards with new information. And doing so will be costly and time-consuming.
You don’t have to undergo this tedious procedure with these cards. A virtual business card is editable, and you can edit all its contents in real-time. Also, your business card page URL will remain the same after editing your information, so you don’t need to reprint your QR code or business card.
Flexibility = Digital business cards
Make your business cards modern and futuristic
Think of a business card.
What do you see? A card with a person’s name and contact details? That’s pretty much it, right?
Most business cards are similar in design and content, and that’s why so many business cards don’t produce results. If your business card looks unique and compelling, more users will engage with it.
One way to make your business card appealing is by printing a QR code on it. A QR code not only adds a unique design to your business card but also makes it intriguing and actionable.
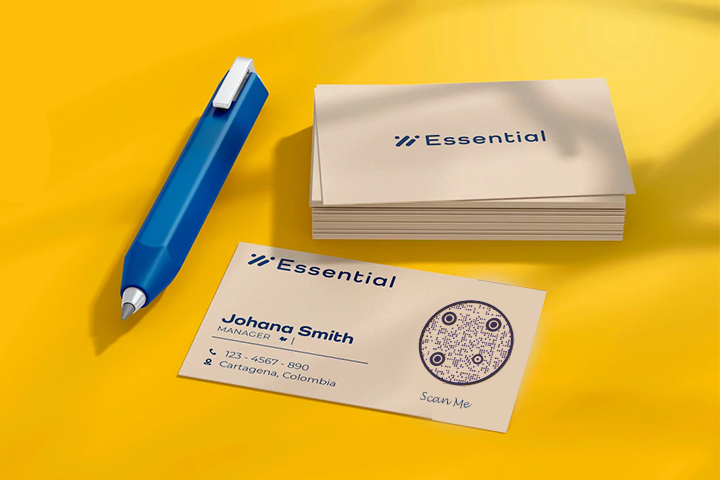
So, you can create a QR code for your digital business card and print it on your business card.
Enhance user experience and satisfaction
In the end, it’s all about offering the best possible user experience. A digital business card makes it effortless for a user to save contact information. All they need to do is scan the QR code on your business card to visit the digital business card page. There, they can find all your information and save your contact info in seconds.
Hence, you can make the contact-saving process hassle-free for the user, resulting in an improved experience and higher satisfaction.
If your sales and marketing strategy involves handing out business cards, you can also incorporate digital business cards in your marketing strategy.
Best practices for virtual business cards
These cards offer tremendous networking potential, but you need to use them correctly. If you’re new to these cards, here are some best practices to follow.
Add a professional profile picture
People will draw conclusions about you based on your photo in 40 milliseconds (0.04 seconds). Clearly, your photo plays the biggest role in creating a solid first impression.
Therefore, it’s crucial to have a good, professional-looking profile picture. If you’re uncertain about your photo, here are some quick tips to click the best profile picture for your e-business card:
- Smile with your teeth
- Dress in formals
- Click a head-to-waist photo with both shoulders visible
- Ensure asymmetrical composition and eyes
- Use a light, simple background
Additionally, here are a few things you should avoid in your profile picture:
- Unnecessary accessories, like hats and sunglasses
- Flashy and casual clothes
Use your full name, job title, and company name
The next thing people will notice after your profile image is your name and job title.
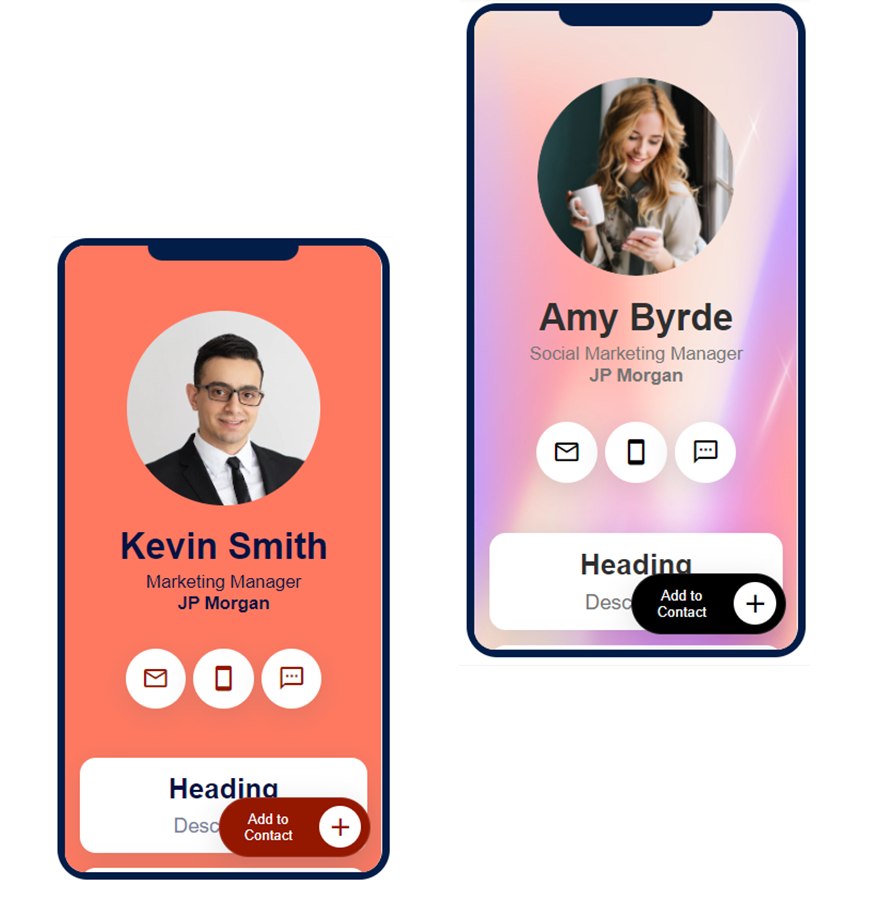
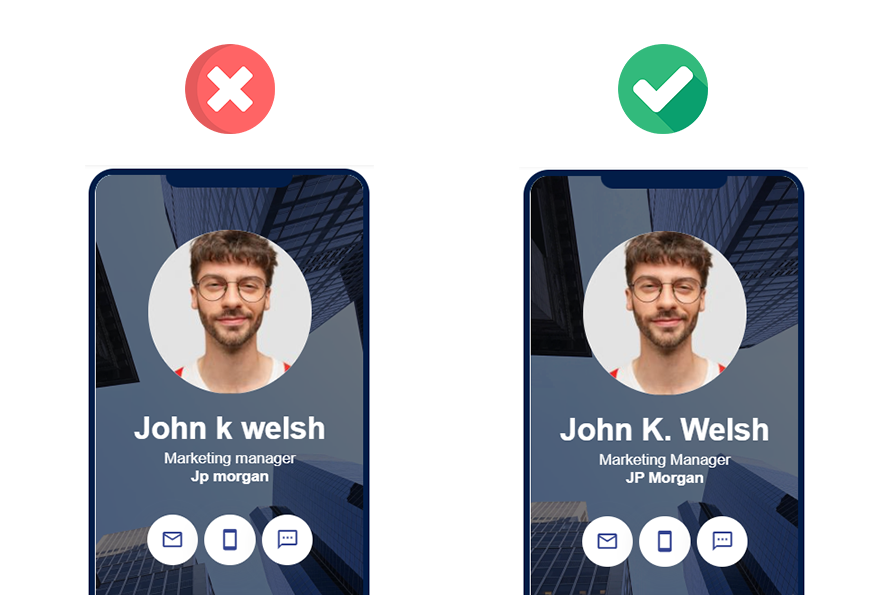
Include your full name on your electronic business card. For instance, if your name is John Kevin Welsh, use John Kevin Welsh or John K. Welsh as the name on your digital card.
Avoid using only your first name, as it can be ambiguous and confusing for your connection.
Next comes your job title, and it’s crucial to clearly state your job title or profession. If you represent an organization, name it too on your virtual business card.
For example, if you are a Marketing Manager at JP Morgan, your job title can be:
Marketing Manager at JP Morgan
or
Marketing Manager, JP Morgan
Pro Tip: Always use the title case for your name, job title, and organization name.
Add all the essential contact details
Next, include all your important contact details to allow people to contact you without any issues.
You should have the following contact information on your business card:
- Phone number
- Email address
- Office address with a location
Apart from this, you can provide other contact details as needed, like fax, office telephone, WhatsApp, etc.
Don’t forget your social media and website links
Social media is the go-to networking channel in this digital age. People who want to know you better will start by looking you up on social media. Therefore, don’t forget to have all your important social media profile links on your virtual business card.
It’s equally important to provide your website URL on your digital business card. Your website is your brand’s representative, and over 38% of users judge a business by its website. So, include your website’s link on your electronic business card to enable users to visit your website and learn about your brand.
Prioritize design, look, and feel
Remember we talked about first impressions a while ago? The design, look, and feel of your electronic business card also play a pivotal role in creating a solid first impression.
The most important design element of this card is the color scheme. Opt for a simple but compelling color scheme to make your business card visually pleasing.
You should keep the following things in mind when choosing a color palette for your online business card:
- Choose colors that align with your brand to ensure consistency and improve brand recall.
- Choose contrasting colors for the background and foreground to make the page elements easy to view.
The font is another important design element. It’s crucial to select a font that aligns with your brand and persona.
For instance, if you want to look professional and formal, opt for fonts like Work Sans, Open Sans, and Roboto. On the other hand, you can choose playful fonts like Concert One, Federo, and Handlee if you want to have a casual and informal persona.
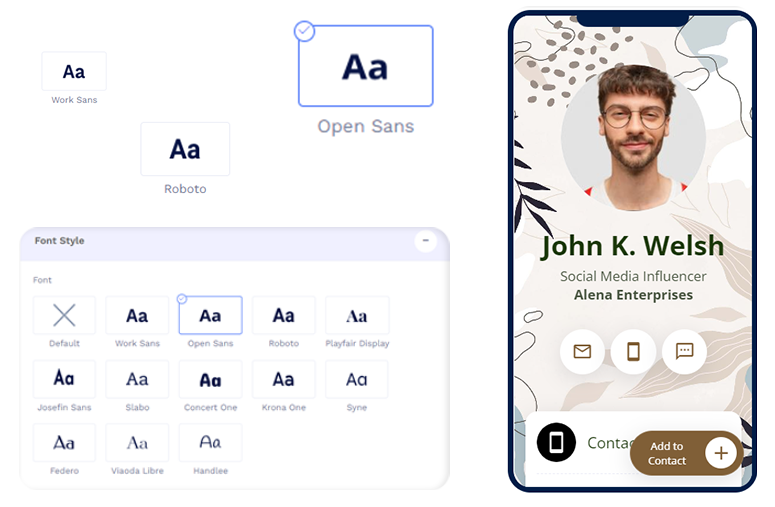
Your background image and page loader will also impact the overall design, look, and feel of your digital business card. So, spend some time choosing the right background image and page loader.
Pro tip: QRCodeChimp offers an array of design and customization options to help you create stunning e-business cards. You can choose from templates, colors, font styles, and other options to design your electronic business cards to perfection.
Use QR codes to share your digital business cards
Once you’ve created a virtual business card, you need to share it effectively so that it reaches a wide audience.
The most effective way to share your e-business card is by printing its QR code on your physical business card. By doing so, you can transform your traditional business cards into a powerful networking tool.
When users receive your business card with a QR code, they can simply scan the QR code and obtain your contact details.
Digital business card mistakes to avoid
Virtual business cards have numerous benefits, and integrating them with your physical business cards can take your networking to another level. That said, here are some mistakes you should avoid when using these business cards.
Not designing the card well
Design is one of the most crucial aspects of your e-business card. A stunning design will grab users’ attention and encourage them to engage with you. So, create a well-designed digital business card that leaves a lasting impact on your connections.
Not updating your information regularly
A big advantage of these cards is you can update your information in real-time. You can change all your details without changing the page URL or reprinting the QR code.
That said, not updating your information regularly is a mistake.
Sharing outdated information with your connections can ruin your impression and hinder your networking efforts.
Therefore, update your details regularly to ensure your contacts get the latest information.
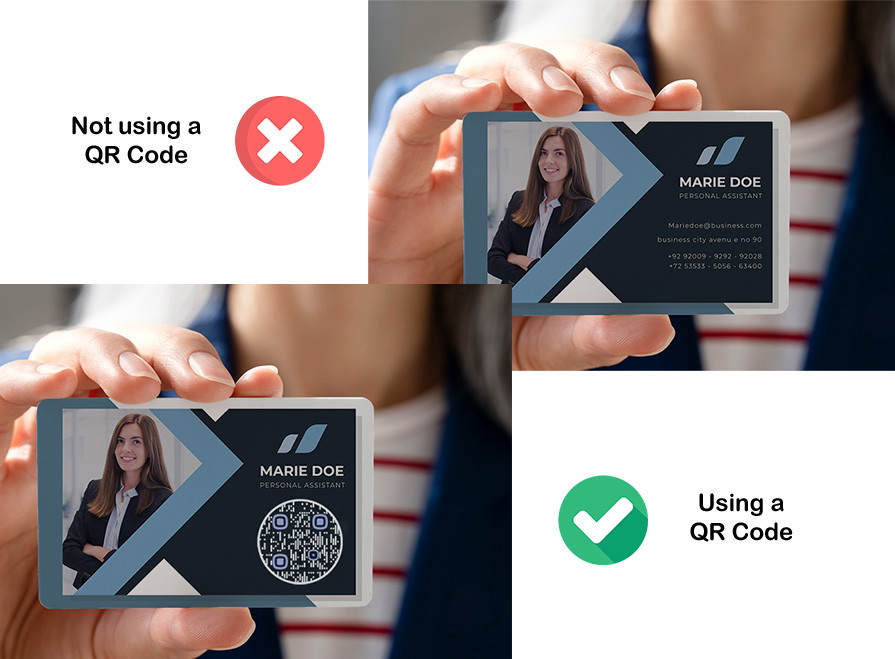
Not using a QR code to share your business card
Printing a QR code on your business card is the best way to share your business card. Not doing so can affect your networking efforts, as business cards are still the norm in networking.
Having incorrect or mistyped information
Mistakes are a big no-no in business cards. For instance, if your phone number is incorrect, people won’t be able to contact you.
Typos in your name or designation may not result in a lost networking opportunity, but they can make you look unprofessional.
So, carefully check all the content on your business card and make sure it’s free of any errors.
Not using images or using low-quality photos
Adding images and videos to your business card can improve your networking efforts significantly. However, you should avoid using low-quality images and videos, as they can do more harm than good. Be sure to include high-quality, professionally-shot photos and videos to get the best results.
Not sharing the complete information
It allows you to share in-depth information about yourself. Not sharing the complete information would be missing out on the real potential of these digital cards. Be sure to provide all the information your connections might need to build a relationship with you.
Not including website or social links
Sharing your name and contact details isn’t enough in this digital age. It’s vital to share your website and social media links so that your connections can know you better. So, always include your website and social media links on your virtual card.
Summary
Digital business cards are no longer a networking trend — they’re the new normal. Traditional business cards alone aren’t as effective as they used to be, as they require users to manually save the information.
A digital business card allows you to instantly share your contact information and helps you expedite your networking efforts.
QRCodeChimp is the #1 rated digital business card solution that lets you create stunning, professional-looking QR code business cards. Sign up for QRCodeChimp today to create a free QR code business card.
You may also like
Step-by-Step Process To Create Digital Business Cards in Bulk
Learn how to use a bulk QR code generator to create and distribute personalized digital business cards for your entire team.
What Information Should You Put on Your Digital Business Card?
Explore which information on digital business card will make the most impact. If you're creating a digital card for the first time, learn from this complete guide to what you should (and shouldn’t) include on your business card.
A Complete Guide to QR Code Analytics
Learn how QR code analytics helps track scans, measure engagement, and optimize campaigns for better results. Unlock powerful insights with real-time data.
Best Digital Business Card to Improve Your Networking
QRCodeChimp's Digital Business Card provides all the features and functionalities needed for creating the best digital business card that elevates your networking. Here's a deep dive into the key features of QRCodeChimp's digital business card and why...
Most Popular
Contact Sales
