Tired of the constant struggle to manage and update business cards for your team?
Managing numerous contacts and ensuring that information is always up-to-date can be a daunting task. Traditional paper business cards come with their own set of challenges: dealing with piles of paper, outdated details, and the hassle of manual distribution. The process can be time-consuming, prone to human error, and involve additional costs for printing and shipping.
Transitioning to digital business cards offers a significant advantage. With a simple scan, comprehensive contact information—like your website, social media profiles, locations, and more—can be shared instantly. High-resolution photos, premium videos, and important files such as manuals and catalogs can also be included effortlessly.
Keep reading to discover how a bulk QR code generator can streamline your team’s networking efforts and enhance their efficiency.
How to use bulk QR code generator for digital business cards in bulk
Follow the steps below to create hundreds or thousands of virtual business cards with the best digital business card platform for your team.
Want to take a quick look? Check out our video to learn how to create digital business cards in bulk.
Note: QR Bulk generator is available for all the users with a PRO or above QRCodeChimp plan.
Phase 1. Visit bulk QR code generator
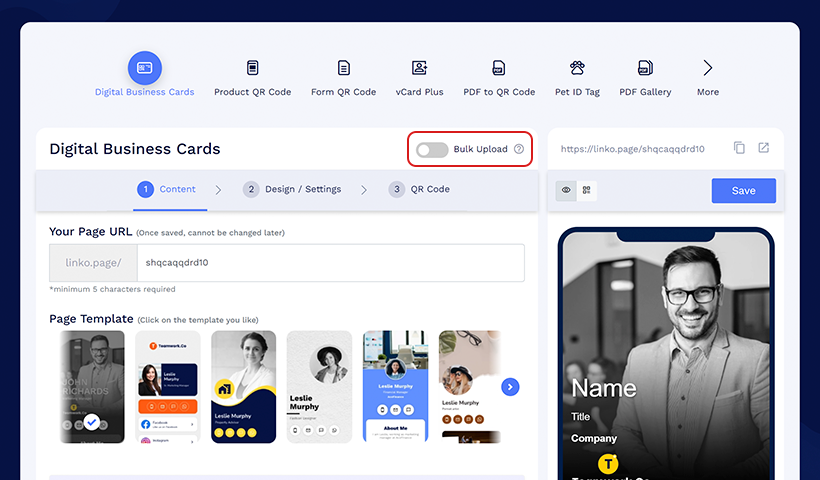
Step 1: Visit QRCodeChimp’s digital business card generator and click the Bulk Upload button.
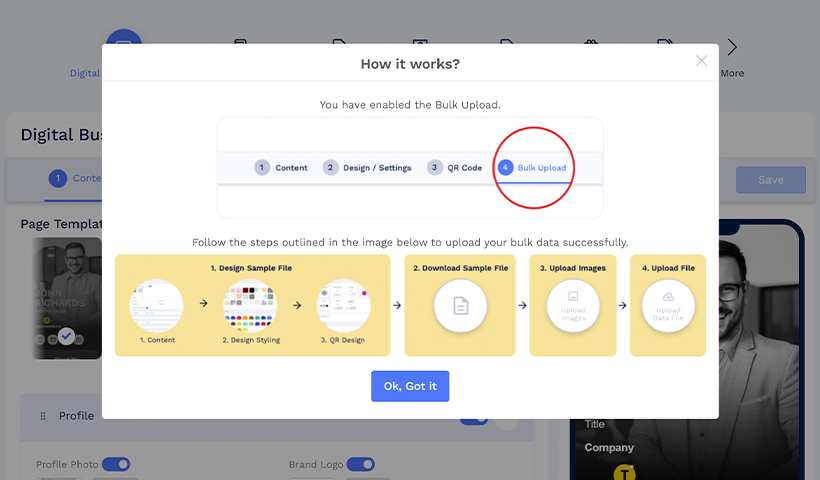
Step 2: A popup will explain the process briefly; click the button Ok, Got it.
Phase 2. Set the information components
Step 1: In the Content tab, select a page template from 20+ professional designs you can customize further. This template will be set for all the cards in the batch.
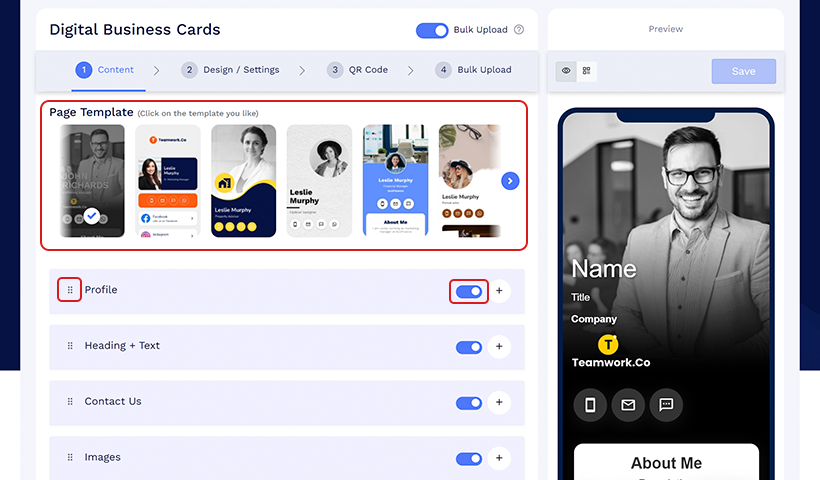
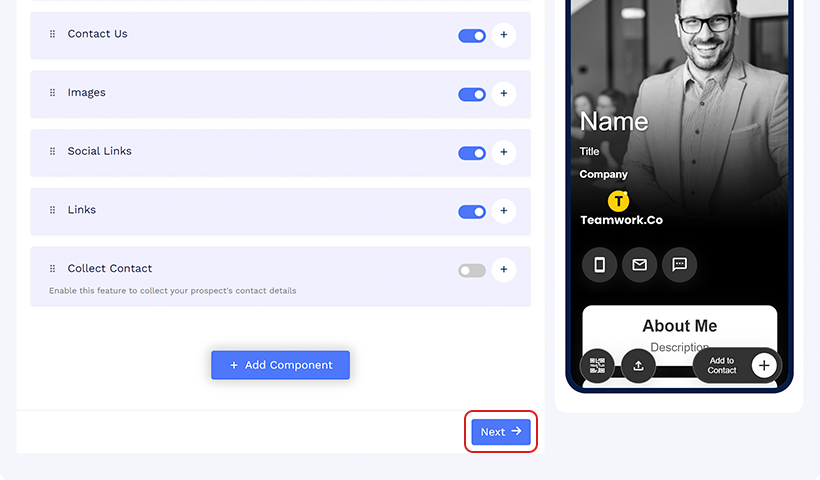
You can enable or disable the components and change their sequence. The sample bulk Excel file will include the data columns for the components with the toggle button turned on. Enabled components will be included in the digital business cards in the same sequence that you set in the content section.
The data for the enabled components will be available for the individuals to edit when shared via share edit access.
Step 2: Enabling the Collect Contact button will show a form to collect contact information of the person scanning your QR code.
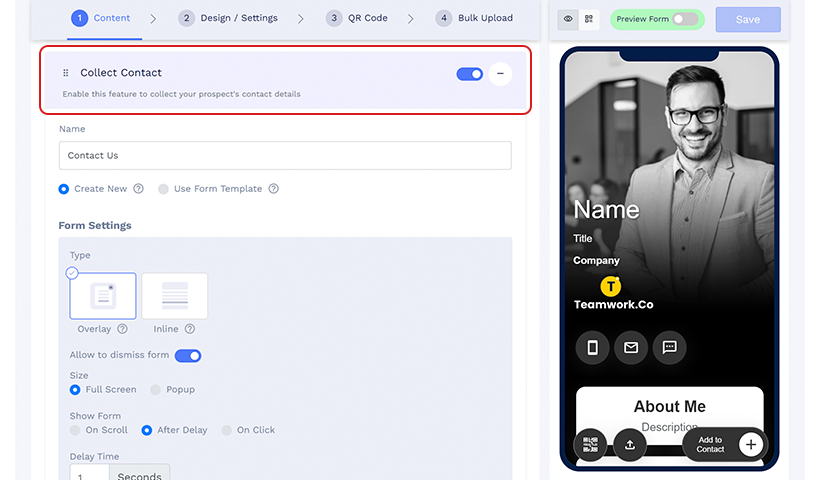
Your digital business card will be updated with a default form template. You can edit the fields to suit your needs.
If you want to learn more about forms, check How to Create Form QR Code to Collect First-Party Data for further instructions.
Step 3: You can add more elements to your business card by clicking + Add Component button.
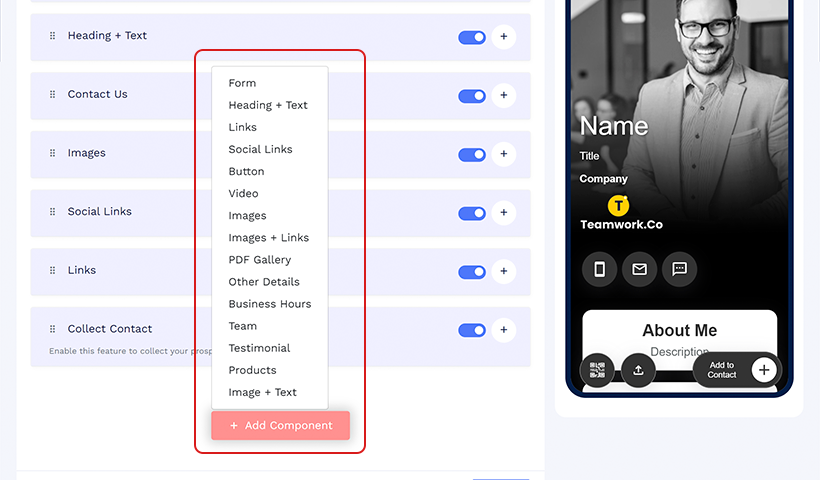
You can add buttons, PDF galleries, business hours, and more. You can also change the sequence of these elements.
Step 4: Click Next, and you will be on the Design / Settings tab.
Phase 3. Design your visual business cards
Step 1: Click Background Image to set a background image or video from our collection of 40+ backgrounds or upload images for your business card background.
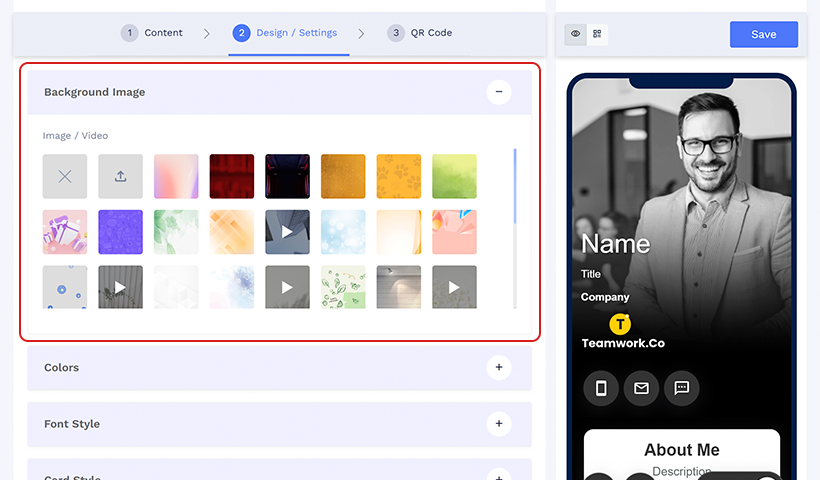
Note: You cannot upload and use videos for the background.
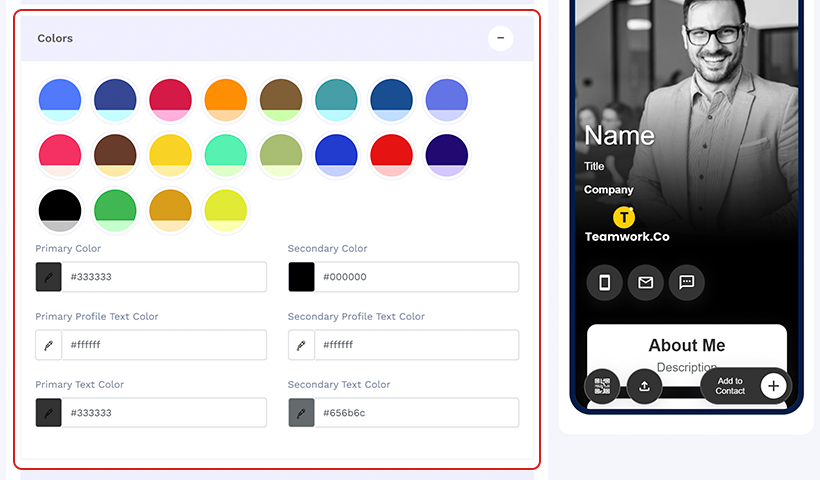
Step 2: Set colors and fonts according to your brand book or brand identity. You can also edit the card style to customize the background color, corners, drop shadow color, etc.
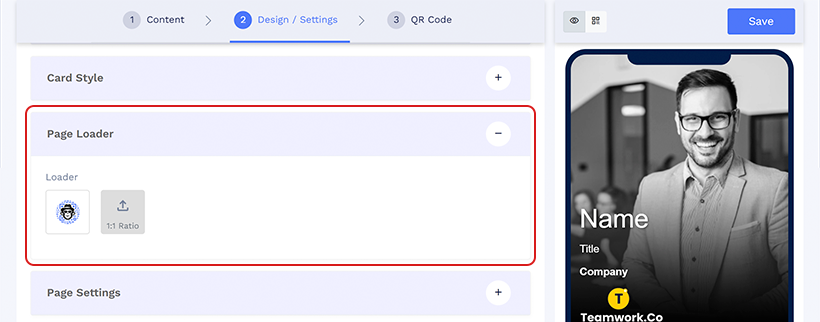
Step 3: You can upload your page loader icon, e.g., your brand logo, under the Page Loader section to change the page loader of the business card. This icon shows when the page is loading after scanning the QR code.
Step 4: In Page Settings, you can turn the scan alert email on or off by clicking the Email me on scan button.
Bonus: Toggle on Track precise location to capture scan locations (with user consent).
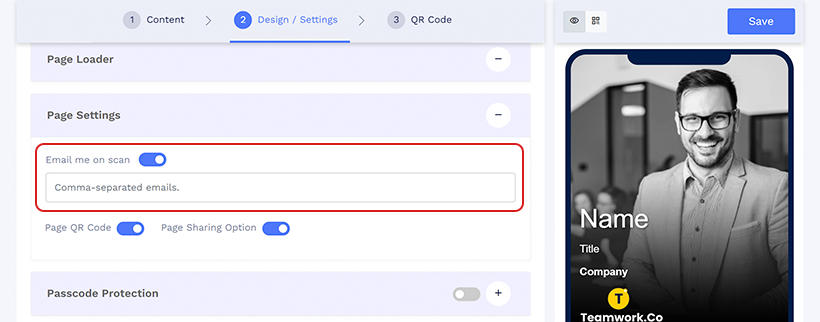
Step 5: Enable Page QR Code to display a mini QR code on your business card. This will allow you to add your digital business card to your Apple Wallet or Google Wallet, as well as to a shortcut and phone gallery.

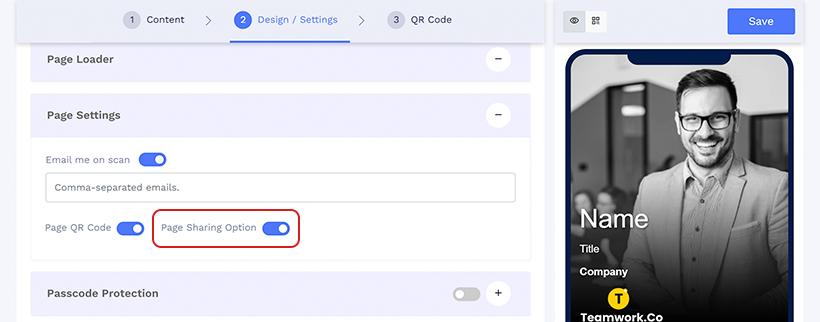
Step 6: Enable Page Sharing Option to provide sharing options.
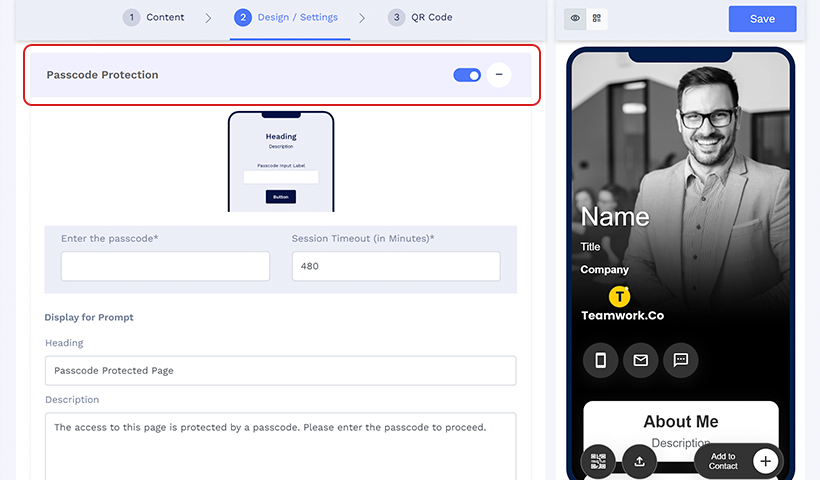
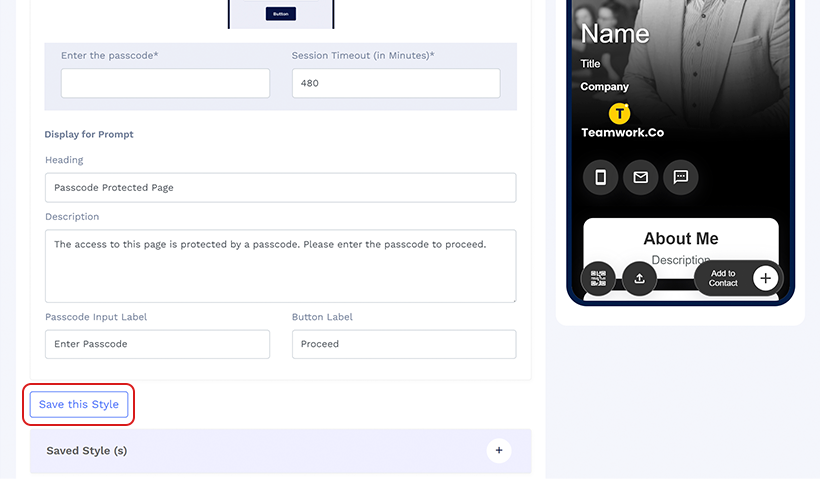
Step 7 (Optional): Enabling Passcode Protection will prompt the users to enter a passcode to access the information after scanning the QR code. Here, set the passcode, session timeout, prompt heading and description, passcode input label, and button label.
Step 8: You can save your digital business card design by clicking on Save this Style, entering the name, and clicking Save.
You can use the same design from Saved Style(s) in the future to maintain design consistency.
Step 9: Click Next to customize the QR code design.

This design will now apply to all the digital business cards in this bulk upload.
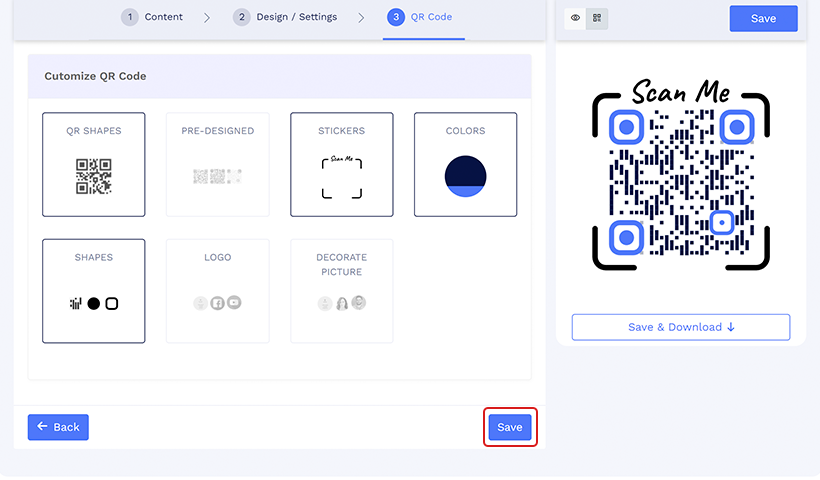
Phase 4. Customize the QR code design
Step 1: Edit the shape of the QR code.
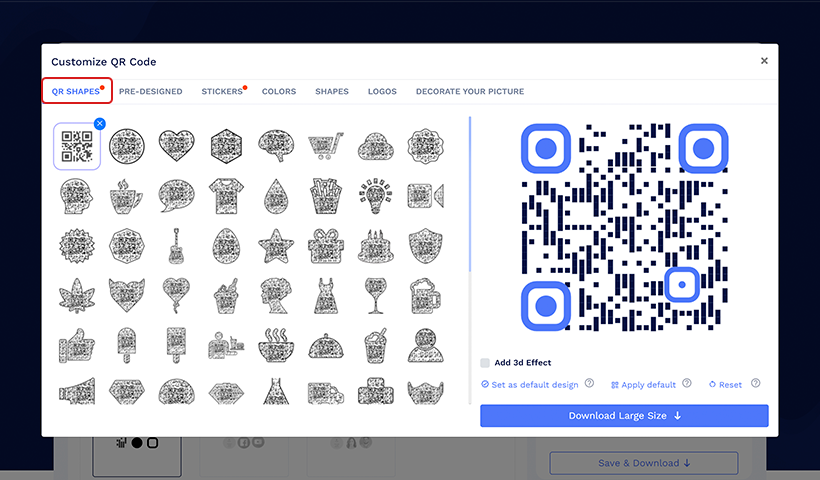
Click QR SHAPES to select from 70+ unique QR code shapes. Further, you can edit the shape, border size, and padding around the eyes.
Step 2: Choose from pre-designed QR code designs.
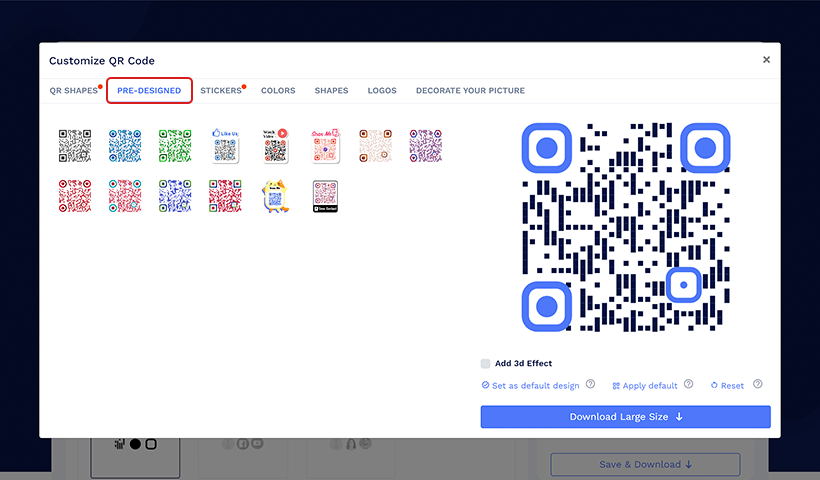
Click PRE-DESIGNED and browse through 10+ professional QR code designs.
Step 3: Add stickers to your QR code.
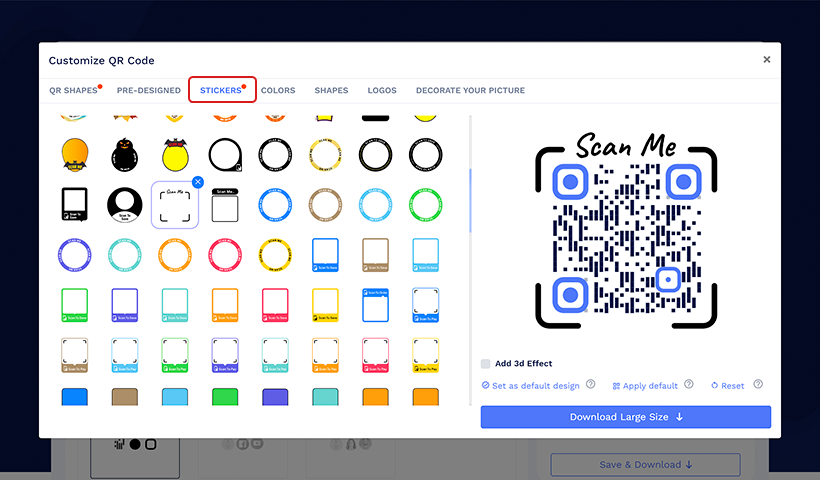
Click STICKERS and select from 200+ QR code stickers for your virtual business cards.
You can also use a CTA sticker for the QR code to compel users to scan the code.
Step 4: Select colors for your QR code.
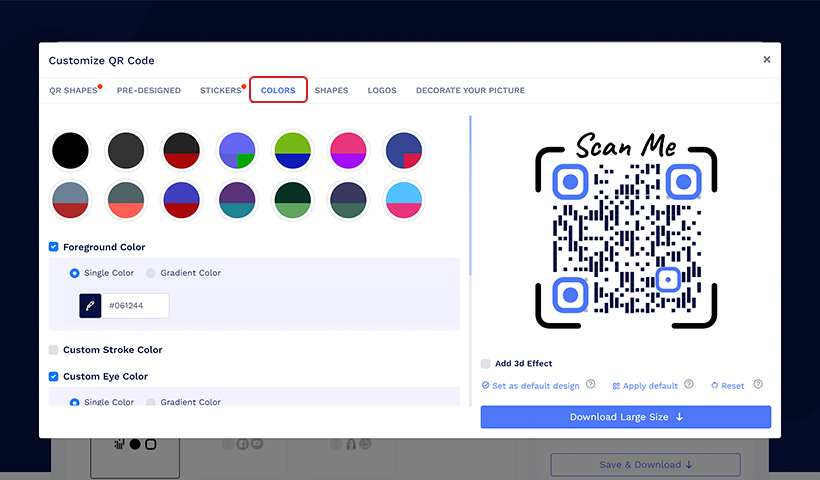
Click COLORS to change and edit the colors of your QR code.
You can set a mono, duo, or tri-color theme and select a solid or gradient color for the foreground, eyes, eyeball, and background.
Step 5 (Optional): Edit the internal elements of your QR code.
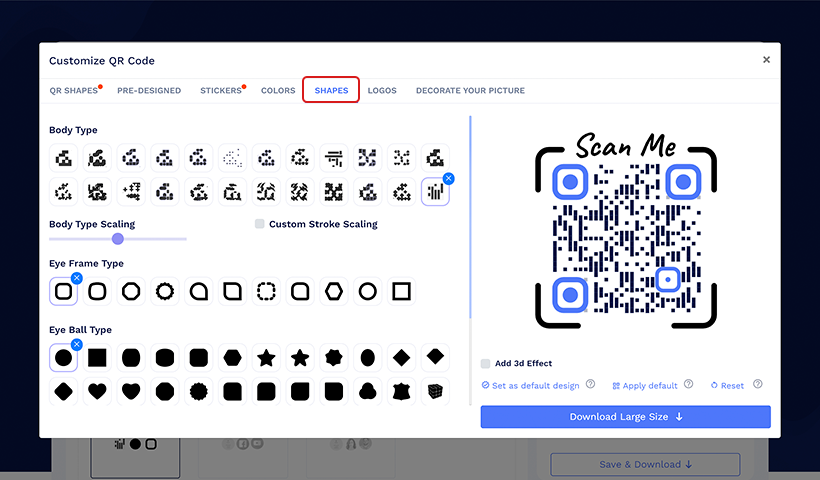
Click SHAPES to edit the shapes in your business card QR code, and you can edit body types, eye frame type, eye ball type, and rounded background.
Step 6: Add logo to your business card QR code.
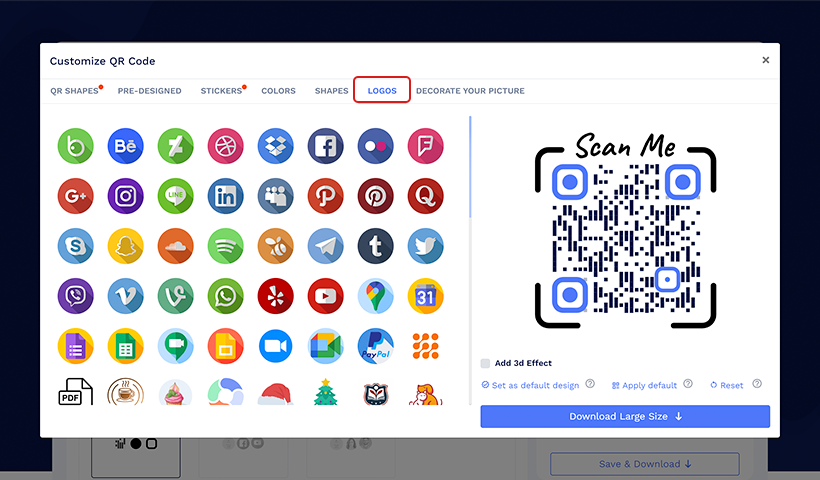
Click LOGOS and upload your logo. Your logo will appear on your branded business card QR code.
You can also edit logo scaling, background scaling, and positioning.
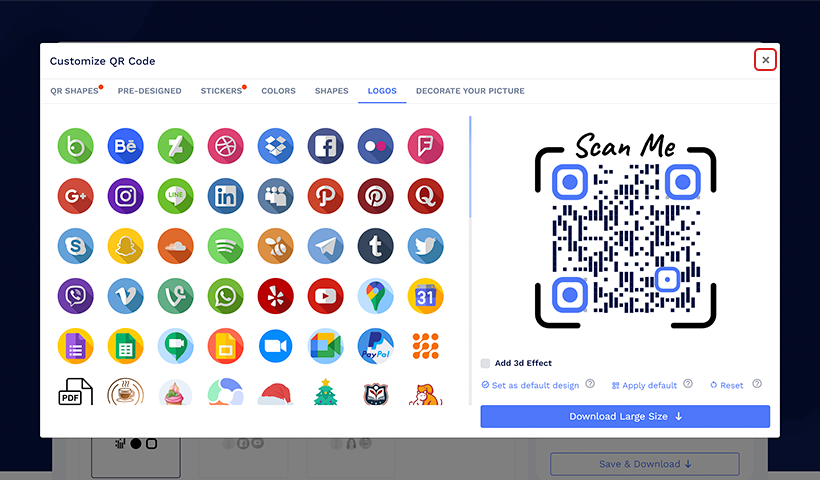
Step 7: Now, click the X icon to close the QR code editing and click Next to proceed.
Phase 5. Bulk upload digital business cards
Step 1: Save work for the sample file.
After clicking Next on the last step, a popup will ask you to save the current work for the sample file. Click Continue.
Step 2: Name your bulk upload and save your business card.
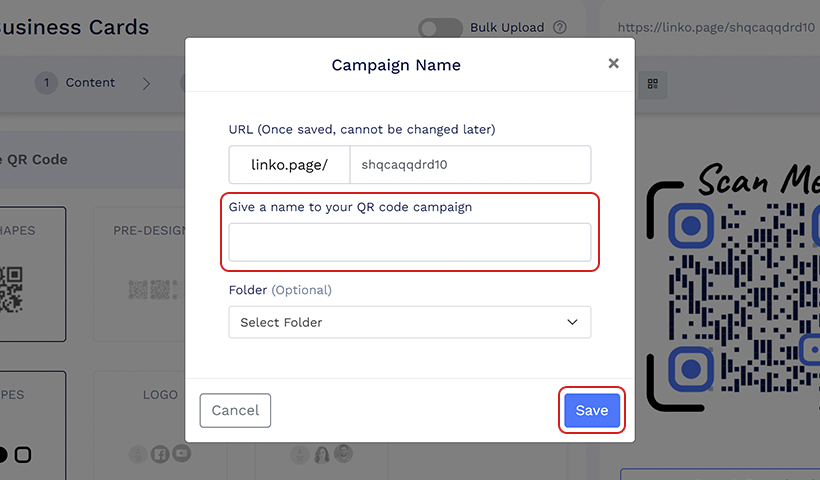
Enter a name for your bulk upload and select a folder (optional). Now, click the Save button and save your virtual business card.
Step 3: Download the sample file.
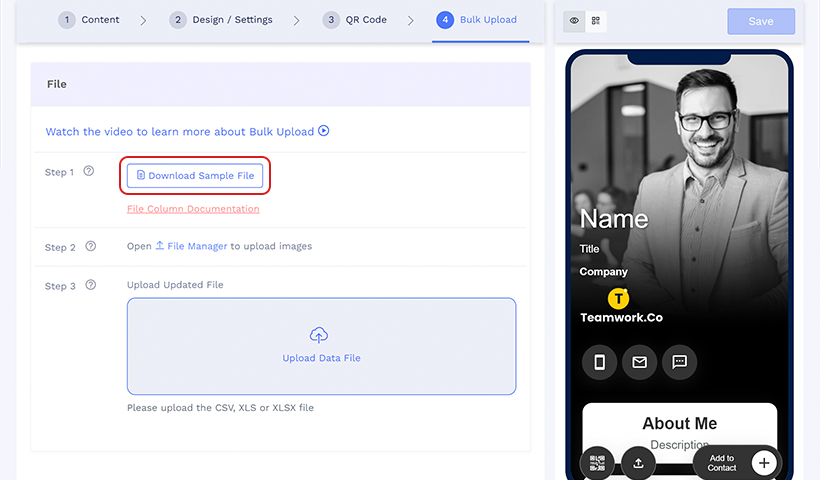
Click Download Sample File to save the Excel file on your device.
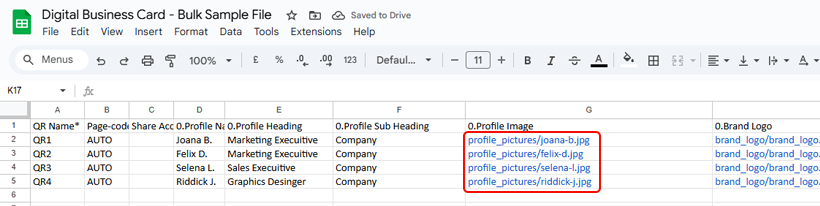
Step 4: Upload profile pictures for all the team members.
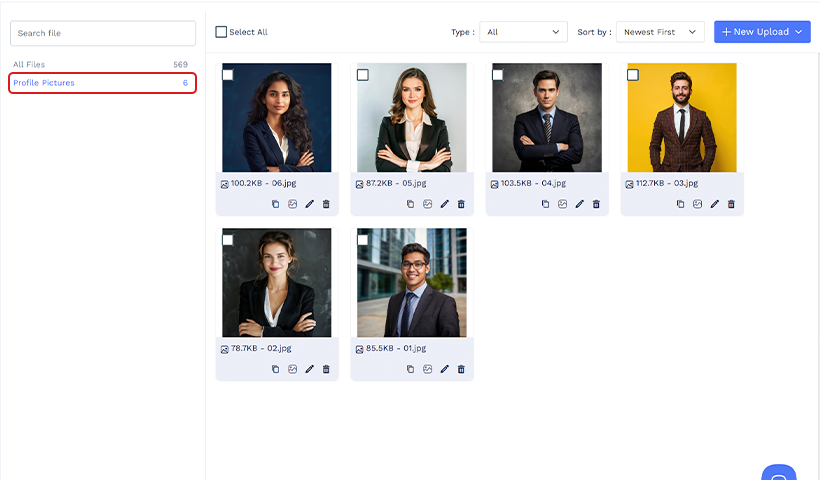
Click File Manager to access the file manager and read the two options for uploading the pictures.
Option A lets you upload a folder of all the pictures. Then, you can enter the filenames in the sheet for each user. With Option B, you can enter the URLs of uploaded pictures from QRCodeChimp’s file manager.
Note: The format to add images is: folder-name/image-name
Click Continue and upload the pictures folder. You can also drag and drop the folder here.
Ensure you name the files in your computer correctly for a seamless process. You can create a format for these pictures, such as john_doe.png, d.john.png, and more.
Once the folder is uploaded to the file manager, close it.
Note: This step can be skipped if you choose to share edit access with bulk upload. In that case, your teammates can upload their images using share edit access.
Step 5: Fill up the sheet.
Enter your team details in the sheet. For more information about the sheet columns, check Column Description for Bulk Uploading Digital Business Cards.
Mandatory fields:
- QR Name – A unique name for each QR code.
- Page Code (Digital Profile URL) – This must be unique for every QR code.
Enter the page code in this column if you want to manually set it.
If you want QRCodeChimp to generate it for you, enter AUTO instead.
Do not leave this field empty.
Edit Access Email – If you want to share edit access with someone, enter their email here. Otherwise, leave it blank.
(When you enter the employee emails in this field, they can enter their personal details and update anytime.)
Important notes:
Before uploading, check the Column Description for detailed instructions and formatting requirements.
Save the file in XLSX, XLS, or CSV format before uploading.
Step 6: Upload the sheet.
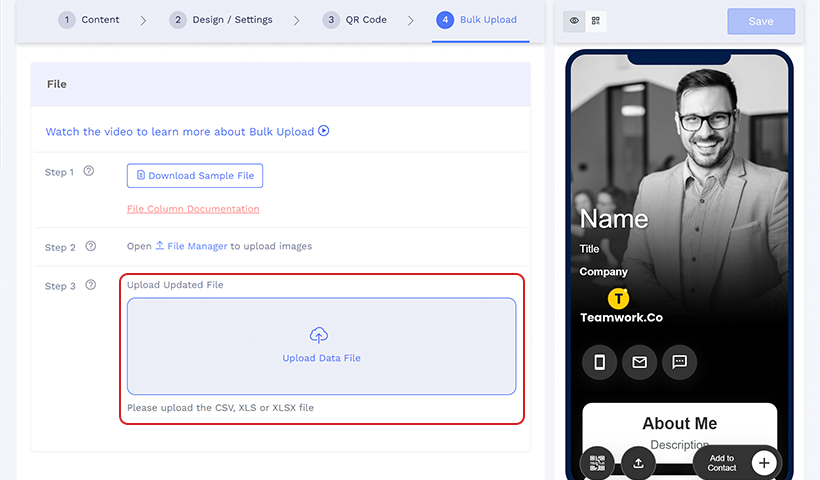
In the Upload Data File box, upload the file by clicking anywhere in the Upload Data File box or drag & drop.
If you see any errors, click Correct and Re-Upload and open the sheet on your device. Then, you can fix the errors and try again.
For files with no errors, you will see a Validation Complete popup informing you that the sheet has been validated. You can also see how many cards it is generating.
Step 7: Click Upload and relax.
Another popup will inform you that the process is running in the background.
Now, click OK and go to your Dashboard to see the upload status.
Phase 6. Distributing your virtual business cards
Once the processing is completed, follow one of the two methods below:
Method 1: Downloading and distributing QR codes (Bulk)
Step 1: Visit the QR Codes Bulk List and identify the bulk.
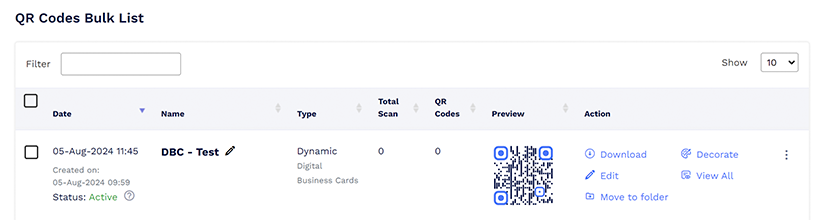
Here, you will see the following options:
| Option | What it does |
|---|---|
| Status | It tells you whether the QR code is active or paused. |
| Total Scan | Total number of scans on all the QR codes in that bulk. |
| QR Codes | Number of QR codes in the bulk. |
| Download | Download the QR codes in bulk. |
| Edit | Edit the content structure or page design of QR codes in bulk. |
| Move to folder | Move the bulk QR codes to a folder. |
| Decorate | Design QR codes in bulk. |
| View All | See all the QR codes in bulk. |
Step 2: Download the QR codes in bulk.
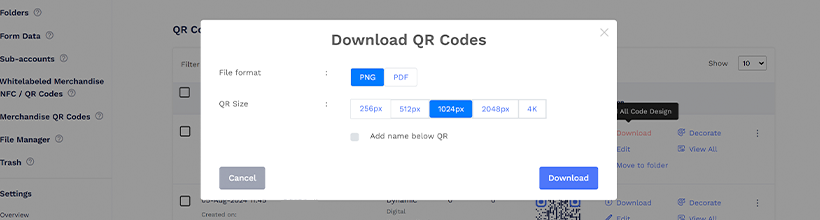
Click Download and then choose the format.
Format: PNG, PDF
Size: 256px, 512px, 1024px, 2048px, 4K
You can also add the name below the QR code for better identification.
Once you set the format and size, click Download.
Now, you will see a popup with the following message: “This is a resource intensive process, your screen may become irresponsive. Please wait for sometime.” Click OK and you are done.
Step 3: Distribute the QR codes.
Send the QR codes to the respective people.
If you choose to share edit access with your teammates, there is no need to distribute QR codes; they can download them from the shared digital business card page.
Method 2: Sharing links via emails (bulk)
Step 1: Click the three dots (⋮) next to the bulk.

Step 2: Click Share QR Code Link via Email.

Step 3: Choose where to pull emails from:
- Primary email in the card profile, or
- Email for Sharing QR Code Link column in your uploaded Excel.

Step 4: Click Share.

Step 5: Click OK to confirm.

The QR code links will be emailed to the selected recipients.
How will your team members fill out their details? Read Sharing Edit Access for Digital Business Cards.
Congratulations! You have taken a step towards networking innovation!
Conclusion
Digital business cards offer a modern and efficient way to exchange contact information and showcase your commitment to innovation. This guide has equipped you with the knowledge to use bulk QR code generator and create and distribute digital business cards in bulk for your entire team.
With customizable designs, bulk upload options, and detailed analytics, you can streamline your networking process and leave a lasting impression on potential clients and partners.
Frequently asked questions
What file formats does the batch QR code generator support for bulk uploads?
You can upload data using an Excel file. The batch QR code generator supports CSV, XLS, and XLSX file formats for bulk uploads.
Can I edit the digital business cards after they’ve been generated?
Yes, you can edit your cards with our batch QR generator. For more information, check How to Edit Digital Business Cards in Bulk.
You may also like
A Complete Guide to QR Code Analytics
Learn how QR code analytics helps track scans, measure engagement, and optimize campaigns for better results. Unlock powerful insights with real-time data.
Digital Business Card: A Complete Guide
You can use a digital business card to share your contact information instantly and grow your network. If you're new to digital business cards, here's the only guide to digital business cards you'll ever need.
A Complete Guide to QR Code White Labeling
Create a custom URL and boost your brand image with QRCodeChimp's QR code white labeling. With your company's domain, make your QR code unique and build more user trust.
Ultimate Guide to Multi-URL QR Code for Your Business
Looking to elevate your brand's digital presence with a multi-URL QR code? Read our detailed guide to discover how to create, implement, and optimize this QR code.
Most Popular
Contact Sales
