Are you looking to integrate Stripe or Razorpay into your white-labeled merchandise subscription platform? Setting up a secure, reliable payment gateway is crucial in offering a seamless checkout experience and building trust with your customers. Whether you’re just getting started or switching to a more efficient payment solution, this guide will walk you through the entire process of setting up a payment gateway — no technical expertise is required.
Let’s get started.
Payment Gateway Essentials: Keys to Seamless Integration
| Publishable Key | Secret Key | |
|---|---|---|
| Purpose | – Identifies your payment requests to the gateway. – Enables secure collection of payment data from customers. | – Authorizes sensitive transactions such as charging cards or issuing refunds. |
| Usage | – Included in client-side code (e.g., checkout pages). – Safe for public exposure as it cannot perform sensitive operations. | – Used in server-side code to execute critical operations. – Must be kept confidential and never exposed in client-side code. |
| Security Considerations | – Designed to be visible in your code without compromising security. | – Must be stored securely on your server to prevent unauthorized access. |
Setting up Stripe payment gateway for white-labeled merchandise subscriptions
In this section, you’ll learn how to set up payment gateway (Stripe) on QRCodeChimp for whitelabeled merchandise subscriptions. We will explain the role of Stripe’s API keys and walk you through the integration process.
Stripe API keys: publishable key and secret key
Stripe uses two types of API keys that work together to secure your transactions. The publishable and the secret keys act as digital identifiers that ensure that only authorized transactions are processed, keeping your data and customer information safe:
Publishable key:
- This is your public identifier used in client-side code (for example, on your checkout page) to collect payment details securely.
- It begins with pk_test_ in test mode or pk_live_ in live mode.
Secret key:
- This private credential is used on your server to create charges, issue refunds, and perform other sensitive operations.
- It begins with sk_test_ in test mode or sk_live_ in live mode.
- It must be stored securely and never exposed in client-side code.
These keys ensure that only authorized transactions are processed and your integration remains secure.
Prerequisites for using Stripe
This is exclusively available for resellers creating customer subscription fee business model. Before you start the integration, make sure you have the following:
Stripe account:
- Sign up and verify your account at Stripe’s website.
- Complete the business verification process by providing your legal business name, tax information, and other required details.
Business account requirements:
- Your account must be set up as a business account to support merchant transactions.
Supported currencies:
- Stripe supports multiple currencies; you can process payments in USD and EUR for your subscriptions.
- Verify that your bank account is configured for the appropriate currency.
- For USD transactions, ensure you have a U.S.-based bank account.
- For EUR transactions, make sure your bank account supports EUR settlements.
Step-by-step process to set up Stripe on QRCodeChimp
Follow these steps to integrate Stripe with QRCodeChimp:
Step 1: Create and verify your Stripe account
Sign up at Stripe and complete the necessary business verification.

Step 2: Test your integration
Use Stripe’s test mode (with keys starting with pk_test_ and sk_test_) to simulate transactions using test card numbers. Verify that payments are processed successfully.

Step 3: Obtain your API keys
3.1: Visit your Stripe Dashboard and click the Developers option on the left panel.

3.2: Then click the API keys tab and check the Standard keys section.

3.3: Copy your Publishable key and Secret key.

Refer to Obtain API keys for detailed instructions.
Step 4: Configure QRCodeChimp
4.1: Visit White Label Merchandise Settings on QRCodeChimp.

4.2: Select Stripe as your payment gateway.

4.3: Paste the publishable and secret keys in their respective fields in the Set Up Your Payment Gateway section.

4.4: Click Next and move on to further process.
Note: If you haven’t logged in to QRCodeChimp, visit QRCodeChimp and log in to your account. Then, click Dashboard at the top right to find the White Label Merchandise Settings in the left panel.
Step 5: Switch to live mode:
Once testing is complete, update your settings with your live API keys (prefixed with pk_live_ and sk_live_).
How to change from test to live mode?
Step 1: Visit the Stripe dashboard.
Step 2: Locate the Test & Live mode toggle at the top right section. Switch it to Live mode.
Step 3: Visit the API keys section in the Developers option (as previously explained) and copy the live publishable and secret keys.
Step 4: Visit White Label Merchandise Settings on QRCodeChimp.
Step 5: Click the Edit button next to 3 Set Up Your Payment Gateway.
Step 6: Enter your live keys and click Save.
You have successfully set up payment gateway (Stripe) with QRCodeChimp.
 Resources and useful links
For additional guidance and support, consult these resources:
Requirements for USD and EUR transactions
This is exclusively available for resellers creating customer subscription fee business model. Before integrating Razorpay, ensure you meet the following requirements:
USD transactions:
- Ensure your bank account is set up to receive USD payouts.
- Verify any additional requirements for U.S. businesses with Stripe.
EUR transactions:
- Use a bank account that supports EUR settlements to avoid conversion fees.
- Confirm that any regional regulations or documentation are in order.
Setting up Razorpay payment gateway for white-labeled merchandise subscriptions
Integrating Razorpay into your platform enables seamless and secure transactions for your white-labeled merchandise subscriptions. This guide will walk you through the essentials, from understanding Razorpay’s API keys to the steps to set up payment gateway on QRCodeChimp.
Razorpay’s API keys: key_id and key_secret
In Razorpay, the API keys consist of two components:
Key ID (key_id): This is your public identifier, similar to a publishable key. It’s used in your application’s client-side code to initiate payment requests.
Key Secret (key_secret): This function is similar to a secret key, which is utilized server-side to authenticate and authorize payment transactions. It must be kept confidential to maintain security.
These keys work together to ensure secure communication between your application and Razorpay’s services. The key_id identifies your account during API requests, while the key_secret authenticates those requests, ensuring that only authorized transactions are processed.
Prerequisites for using Razorpay
Before integrating Razorpay, ensure you meet the following requirements:
Account: Sign up for a Razorpay account and complete the necessary verification processes.
Business account requirements: To comply with Razorpay’s onboarding procedures, you must complete KYC by providing proof of identity, address, banking details, and contact information.
Supported currency: Razorpay primarily accepts transactions in Indian Rupees (INR). Ensure your business is prepared to handle INR payments.
Step-by-step process to set up Razorpay on QRCodeChimp
Follow these steps to integrate Razorpay with QRCodeChimp:
Step 1: Create and verify your Razorpay account
Visit Razorpay’s website and sign up for an account. Complete the verification process by providing the required business details.

Step 2: Generate API keys
2.1: Visit your Razorpay Dashboard.

2.2: Switch the Test Mode On from the header.

2.3: Navigate to Account & Settings in the left panel.

2.4: Under Website and app settings, click API Keys.

2.5: Click on Generate Key to create your key_id and key_secret.
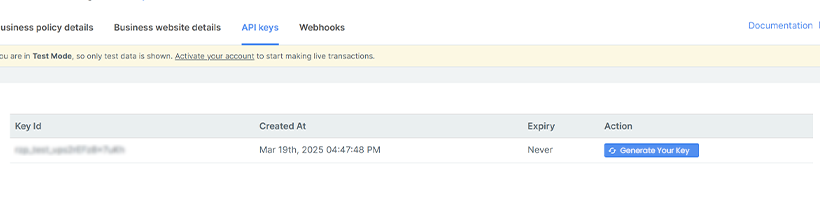
2.6: Download and securely store these keys, as the key_secret will not be displayed again.

Step 3: Configure QRCodeChimp
3.1: Visit White Label Merchandise Settings on QRCodeChimp.

3.2: Select Razorpay as your payment gateway.

3.3: Enter the key_id and key_secret obtained from Razorpay into the respective fields in the Set Up Your Payment Gateway section.

3.4: Click Next and move on to further process.
Note: If you haven’t logged in to QRCodeChimp, visit QRCodeChimp and log in to your account. Then, click Dashboard at the top right to find the White Label Merchandise Settings in the left panel.
Step 4: Test the integration
Use Razorpay’s test mode to simulate transactions and ensure everything functions correctly.
Step 5: Go live
Once testing is successful, switch to live mode in Razorpay, generate new keys, and enter them in QRCodeChimp to start processing actual transactions.
How to change from test to live mode?
Step 1: Visit the Razorpay dashboard.
Step 2: Locate the Test & Live mode dropdown at the top right section. Select Live mode.
Step 3: Visit the API keys section under Website and app settings in Account & Settings (as previously explained) and copy the live Key Id and Key Secret.
Step 4: Visit White Label Merchandise Settings on QRCodeChimp.
Step 5: Click the Edit button next to 3 Set Up Your Payment Gateway.
Step 6: Enter your live keys and click Save.
You have successfully set up payment gateway (Razorpay) with QRCodeChimp.
Resources and useful links
For further assistance, refer to the following resources:
Requirements for INR currency
When processing payments in INR, consider the following:
- Bank account: Ensure you have an Indian bank account to receive settlements in INR.
- Regulatory compliance: Adhere to local financial regulations, including tax obligations and reporting standards.
Summing it up
Integrating a payment gateway into your business operations is straightforward and can significantly enhance the customer experience. Streamlining transactions can improve efficiency and build trust with your clientele.
Selecting the appropriate payment gateway should align with your business requirements. Consider factors such as transaction fees, supported payment methods, security features, and ease of integration.
We encourage you to assess your business needs carefully and choose the payment gateway that best suits them. A well-selected gateway facilitates seamless transactions and contributes to a positive customer experience, ultimately supporting your business growth.
Frequently asked questions
What API keys are used in Stripe, and what do they do?
Stripe uses two types of API keys: the publishable key and the secret key. The publishable key (prefixed with pk_test_ or pk_live_) is used in your client-side code to securely collect payment details, while the secret key (prefixed with sk_test_ or sk_live_) is used on your server to authorize critical operations like charging a card or issuing refunds.
What are Razorpay’s API keys, and how do they function?
Razorpay provides two key credentials: the key_id and the key_secret. The key_id serves as your public identifier in client-side interactions, and the key_secret is used on your server to authenticate and authorize payment transactions. Together, they secure your integration.
What are the prerequisites for setting up a payment gateway on QRCodeChimp?
Before integrating, you must:
- Sign up and verify your account with Stripe or Razorpay.
- Complete the business verification process by providing legal business details and documentation.
- Ensure your account is set up as a business account to support merchant transactions.
- Confirm that your bank account is configured for the relevant currencies (USD/Euro for Stripe; INR for Razorpay).
Which currencies are supported for subscription transactions?
With Stripe, you can process payments in USD and Euro, provided your bank account is set up for the respective currency. Razorpay, on the other hand, supports transactions exclusively in INR.
How do I switch from test mode to live mode during integration?
Begin by testing your integration using the test API keys (e.g., pk_test_ and sk_test_ for Stripe or Razorpay’s test mode keys). Once you’ve confirmed everything functions as expected, update your settings with the live API keys to start processing actual transactions.
Where can I find additional support and resources?
For more detailed guidance, refer to the documentation provided by each payment gateway:
- Stripe API keys documentation
- Razorpay API keys documentation
- Additionally, QRCodeChimp’s support center is available to help troubleshoot any issues during your integration process.
You may also like
How to Create and Scan Wi-Fi QR Codes on iPhone and Android?
Learn how to create and scan a Wi-Fi QR code effortlessly on both iPhone and Android devices. Streamline connectivity and enhance user experiences with these QR codes!
Easy Steps to Use NFC Business Cards on iPhone and Android
Dive into a guide on how to use NFC business cards effectively on your iPhone and Android devices. Step into the future of networking with NFC cards.
API Integration in QRCodeChimp Forms to Connect with Your CRMs
Refer to this tutorial on API integration in forms and seamlessly integrate QRCodeChimp forms into your CRM system for automated data transfer and streamlined workflow.
How To Create RSVP QR Codes: 4 Easy Methods for Any Event
Learn how to create invitation using RSVP cards with QR codes to streamline event RSVPs. QRCodeChimp helps you make RSVP for different events and different ways. Explore our QR code generator now.
Most Popular
Contact Sales
